
On this page
Three ways to frame a moment. One shared adventure.
A bridge can come alive through a few spoken details, a sketch of connected places, or a map counted in Spaces. Scene Modes help you choose how to describe and track that bridge so everyone can picture their choices.
As the Guide, you describe the situation and help the players understand what their characters can try. Their choices give you something to respond to. You get to discover what happens together.
Cinematic Mode is the recommended starting point. Choose the Mode together, and use the least detail that keeps the current choices clear. You can add detail as you need it, then return to a broader view.
Scenes and Scene Kinds
A Scene is a stretch of play with a clear beginning and end. As the Guide, tell the players when a Scene starts and when it ends.
Every Scene has a Scene Kind. Choose the Kind that best fits what the characters are doing.
| Scene Kind | What the characters are doing |
|---|---|
| Social | Talking, bargaining or dealing with other characters. |
| Exploration | Travelling, searching or discovering a place. |
| Challenge | Dealing with a problem, such as a chase or a trap. |
| Combat | Fighting when the order of actions matters. |
Choose the Kind and Mode separately. A Social Scene can use Story Mode and a Combat Scene can use Tactical Mode. Any Kind can use any Mode.
What Are Scene Modes?
Choose a useful view of the same world.
Definition
A Scene Mode is a way to describe and track position and distance. Narateer has three:
| Mode | What you establish | Useful when… |
|---|---|---|
| Story | Clear relationships: beside the door, outside sword reach, behind cover. | Everyone can understand the next choices from those relationships. |
| Cinematic | Named areas called Zones, their connections, and important positions within them. | People are moving between distinct places and a few local details matter. |
| Tactical | Exact positions on a square or hex map, using 2 m Spaces. | A precise route, reach or area boundary can decide the result. |
You can explore, talk or fight in any Mode. You can describe all three with atmosphere, urgency and imagination. Choose from the information the next decision needs: a simple fight may work in Story Mode; crossing a trapped floor may benefit from Tactical Mode.
The same Action procedures, costs, limits and effects apply throughout. Use Distance & Range to measure and convert distances. Follow Movement for movement allowances and routes.
Turns and Timing
You can use sides, turns and Rounds in any Scene Kind and any Mode. Use them when it matters who goes next or how much time passes. For example, take turns searching a flooding ruin or making offers before a council vote. Use a turn tracker to mark who has acted this Round and which side goes next. Using turns on its own does not change the Scene Kind or cause a Scene Reset.
Entering Combat ends the current Scene, starts a Combat Scene and causes a Scene Reset. Ending Combat closes the Combat Scene and causes another Scene Reset. If play continues, begin the next Scene and keep following urgent recovery, hazards and effects.
You can keep the same Mode at either boundary. Changing Mode on its own does not start a new Scene or cause a Scene Reset.
Running a Scene
Give the players something clear to act on. Let their choices move it forward.
Use this conversation in any Mode:
- Describe the situation. Say what the characters can perceive. Give them a few useful landmarks, the people or creatures present, and any noticeable danger or opportunity.
- Establish the relevant positions. Explain enough for the next choices: who is within reach, what offers cover, where a route leads, or which positions an area can affect. Keep undiscovered information hidden.
- Ask for intent and method. “What do you want to achieve, and how do you try it?” Players can suggest approaches you have not anticipated.
- Clarify before commitment. Confirm the relevant route, target, requirements, costs and known risks before the player spends resources. Use the procedure that governs the attempt. Actions helps you choose it; Skill Checks explains meaningful uncertainty.
- Resolve and update. Describe the result, update the affected positions and explain what changed. Continue from that new situation. During combat, keep the normal turns and responses.
You only need to explain the details relevant to the choices people can make now. Other details can emerge through questions and actions.
At the table: “You stand at the near end of the bridge. The gate lever is across it. The bridge is clear, but you hear someone trying to force the gate. What do you do?”
If a player asks a question you had not considered, pause and establish the answer from the situation and the rules. A useful question helps everyone build the scene.
For a mistake in an action or record already resolved, use Correcting a Mistake.
Story Mode
Keep the important relationships clear, and let the conversation carry the scene.
Mode Overview
Story Mode uses concrete fictional relationships rather than a grid or counted Zones. Say where people are in relation to things they could act on.
Useful descriptions include:
- beside the lever and within reach of it;
- across the bridge, reachable by Running this turn;
- nearby, but outside ordinary melee reach;
- behind the wall, out of sight;
- within the bow's Effective Range; or
- clustered around the altar, with one person sheltered behind a pillar.
Keep an established relationship until movement, an effect or another change alters it. Preserve differences in movement allowance, weapon Range, Reach Rating, terrain and barriers. Distance & Range: Story Mode explains how those relationships carry the normal rules.
When someone declares an action, clarify the relationship it depends on before commitment. “Nearby” may be enough while the group talks; “outside your sword's reach” is more useful when someone wants to attack.
Example: Shrine Approach
We will use this same situation in all three Modes. During her turn, Mira wants to reach a shrine's gate lever. It is 20 m along a clear, ordinary route across a bridge. Mira has Base Movement 10 m, has not moved this turn and has at least 1 Ready Action Die (AD). No Condition, discount or other effect changes her movement or costs. No enemy can react along this route.
Guide: “The lever is at the far end of the bridge. You can reach it by Running this turn. Walking will leave you short, and the route is clear.”
Mira: “I Run across to the lever.”
Run costs Mira 1 AD and allows 20 m of movement. She reaches the lever and has used that allowance. No movement roll is required. Reaching the lever puts it within reach; operating it follows the normal Action rules.
Guide: “You reach the lever as the gate shudders. What do you try next?”
When the Route Is Risky
If the bridge has a dangerous gap, establish the gap and the risk before commitment. The chosen movement mode determines Mira's allowance. A risky leap follows the separate procedure in Skill Checks During Movement.
Explain what success achieves and what failure risks, then let Mira choose her approach. Sprinting alone does not resolve the leap. Story Mode keeps those requirements while expressing the route through the fiction.
Cinematic Mode
Give the action a few clear places to move between.
Mode Overview
Cinematic Mode uses Zones: distinct areas such as a bridge, a courtyard, a rooftop or part of a large hall. A few names and a rough sketch can show the scene. Track each character's Zone and important local positions, such as beside the door, behind cover or within melee reach.
Setting Up Zones
Begin with the place the characters already occupy, then add the areas relevant to their choices:
- Name the areas. Use recognisable landmarks. Separate areas when a boundary, route, height or other meaningful difference helps people follow the action.
- Establish how they relate. Which Zones are adjacent? Which have legal movement connections? Describe known doors, stairs, gaps and other barriers.
- Place the participants. Name their Zones and any local position that could affect a choice. Establish cover, visibility and melee reach when they matter.
- Check the distances. Use the existing place and routes to check that the layout preserves the relevant movement and Range decisions. If an unusually large Zone hides a distance that changes one of those decisions, split it before commitment, following Distance & Range.
For the shrine approach, a simple layout is:
Riverbank ↔ Bridge ↔ Shrine Entrance
| Zone | Connections and positions |
|---|---|
| Riverbank | Mira starts at the agreed position by the Bridge connection. |
| Bridge | An ordinary route connects Riverbank to Shrine Entrance. |
| Shrine Entrance | The lever is at the agreed entry position from Bridge. |
In this layout, reaching the lever uses two ordinary Zone crossings. Establishing the lever at the entry position makes clear that Mira needs no further local movement to reach it.
The Zone names help you follow the existing scene. If deciding a boundary becomes difficult because an exact distance matters, use Tactical Mode to settle that position or route before commitment.
Adjacency and Movement Connections
Adjacent Zones lie immediately beside one another. Connected Zones have a legal movement route between them. They answer different questions:
- For movement, follow the legal connected route.
- For Range, count the fewest adjacent Zone steps, then check sight, line of effect and other requirements.
A balcony can be adjacent to the courtyard below, with a clear view between them. Reaching it on foot may require going through a stairway Zone. The short Range relationship does not create a direct walking route.
Using Movement and Range
Convert printed metre values through the formal 10 m Zone-snapping rule: calculate the complete value, round to the nearest 10 m, then divide by 10. Round halfway values up. A 20 m allowance becomes 2 Zones; 26 m becomes 3 Zones. A Zone's fictional footprint can vary; it is not a fixed 10 m square. See Zone Snapping.
Keep the resulting movement allowance and subtract what the character spends. On an ordinary route, each crossing into a connected adjacent Zone costs 1 Zone of movement. Agree the entry position. Moving to another local position can cost more.
Within a Zone, agree a reposition's distance before moving. Each metre costs one tenth of a Zone, before terrain or other route costs. For example, a 3 m approach costs 0.3 Zones. Being in the same Zone does not grant free movement or put everyone within melee reach.
If a positive movement allowance snaps to 0 Zones, follow Movement's local procedure: the original metres can still permit local movement, but cannot cross a Zone boundary. For a zero-Zone area or other effect, follow that effect's specific rule. A zero-Zone area does not automatically fill the Zone.
Example: Crossing the Shrine Bridge
Use the same Mira, clear 20 m route and lever established in the Story example. Her 10 m Walk converts to 1 Zone. Her 20 m Run converts to 2 Zones.
Guide: “You're on Riverbank. Bridge connects you to Shrine Entrance, where the lever is right at your arrival point. There are two ordinary crossings. Your Run can get you there.”
Mira: “I Run to the lever.”
Mira pays 1 AD. The first crossing spends 1 Zone; the second spends the remaining 1. She reaches the lever. No roll is needed and no movement remains.
Local Positions Still Matter
When someone reaches Shrine Entrance, a guard standing farther inside it may still be outside their melee reach. Establish that relationship before an attack. A pillar may give cover or block a view even though both creatures share the Zone.
If local positioning becomes the main question, a rough grid can help. Follow When the Picture Becomes Unclear.
Tactical Mode
Put the important positions where everyone can see them.
Mode Overview
Tactical Mode uses a square or hex map. Each Space represents 2 m. A quick grid with labelled marks is enough to establish positions; use whatever map and markers help your group follow the scene.
Before an affected declaration, establish:
- each relevant character's Space;
- the destination or target;
- the legal route and any terrain costs;
- known barriers, cover and changes in height; and
- the origin and boundaries of an area, when needed.
Use Counting Spaces for distances and areas. Follow Movement for the route and Combat for attacks and responses.
Keep describing what the characters experience. The map gives you clear positions from which to describe their choices and consequences.
Example: Spaces on the Shrine Bridge
Use the same Mira and route. The lever is 10 Spaces away along ordinary ground. Mira has not moved and has no relevant movement or cost modifiers.
Guide: “The lever is ten Spaces along this route. Your Walk reaches five. Your Run reaches ten.”
Mira: “I Run to the lever.”
Mira pays 1 AD and moves the 10 Spaces. She reaches the lever with no movement remaining, exactly as in the other two examples.
If part of another route is Difficult terrain, that part spends movement at twice the ordinary rate. Explain that cost before commitment. See Terrain and Route Costs.
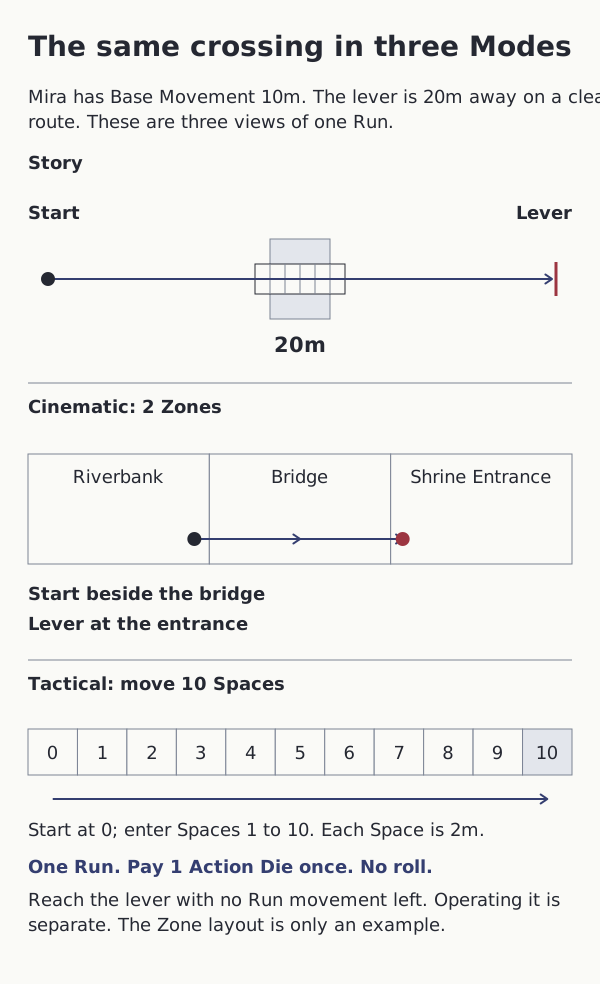


Read the diagram as text
Mira has Base Movement 10m. The lever is 20m away along this clear route. These are three views of one Run, not three consecutive moves.
- Mira has not moved this turn and has at least one Ready AD. There are no relevant movement modifiers, hazards or enemy reactions along this clear ordinary route.
- Choose one Run: Base Movement 10m × 2 = 20m. Pay one AD, with no roll.
- Story view: the same Run carries Mira across the bridge to the lever.
- Cinematic view: Mira starts in Riverbank beside its Bridge connection. Cross Bridge, then enter Shrine Entrance. The lever is at the agreed arrival position, so there is no extra local approach.
- Tactical view: start at Space 0 and move into Spaces 1 through 10. Those ten moves are twenty metres. The eleven drawn positions are not eleven moves.
Result: All three views reach the same lever, spending the same one AD and the same whole Run allowance. Changing view grants no second Run or payment.
- A Zone’s fictional footprint is not fixed at ten metres. This is an example layout, not a universal two-Zone bridge.
- Changing Mode preserves positions, the current turn, the side due next, resources, effects and the unused movement fraction. It grants no Activation, Refresh, Scene Reset or extra movement.
Shifting Scene Modes
Keep the situation. Change the view that helps you follow it.
You can suggest a shift when the present Mode makes a decision hard to explain, or when its extra detail is no longer useful. A player can ask for clarification or suggest a different view too.
“Let's put this part on a grid so we can see the route past the guard.”
“The chase has ended. Shall we describe where everyone is and continue in Story Mode?”
Making the Change
Agree on the new Mode and announce it before resolving an affected declaration:
- Restate the established facts. Keep who is acting, their intent, targets, positions, routes, barriers and areas.
- Carry the current state forward. Keep the current turn, the side due next, whose turns have happened, dice, injuries, Conditions and ongoing effects. A shift grants no extra Activation, movement, Refresh or Scene Reset.
- Represent the same situation in the new Mode. Use Distance & Range. Preserve the same actor, eligible targets, scale, direction and established outcome. Follow the specific movement or effect rule for any zero-Zone result.
- Clarify anything that was not yet established. Agree the missing positional detail consistently with the known facts before the affected commitment. Check that everyone understands the choices, then continue.
An already resolved action keeps its payment and result. An effect whose area and targets have already been established keeps them through the shift; converting its units does not add or remove those targets.
From a Description to a Map
You established that Mira is beside the broken column, outside the guard's sword reach, with a clear route to the door. Put those facts on the map first. Choose positions that preserve all three relationships. Clarify the remaining placement with the group before resolving an action that depends on it.
If an exact position or distance had already been established, keep it. Increasing detail gives agreed facts a clearer representation.
Example: Half a Run Remaining
Mira's full Run is 20 m: 2 Zones or 10 Spaces. She has spent 1 Zone, so half the allowance remains. The group changes to Tactical Mode. Half of the full 10-Space allowance remains: 5 Spaces.
Keep the unused fraction through any further shifts. Subtract new movement normally; do not round the remainder into a fresh allowance. Follow Changing Mode During Movement, including its rules for zero-Zone local movement and entering complete Spaces.
When the Picture Becomes Unclear
Pause together. Find the detail that will help.
If people picture the scene differently, ask which fact would settle the next choice:
“Are you trying to reach the door, or get beside the guard?”
“We know the column blocks his view. Let's mark where you can emerge from behind it.”
Restate the established positions, clarify the relevant unknown detail and confirm the ruling before resources are committed. A sketch can help in any Mode. Keep information the characters have not discovered hidden.
Movement Inside Melee Reach
Opportunity Attacks use the same Trigger in all three Modes. Entering or leaving melee reach alone does not trigger one. A step between positions that are both within reach can.
Establish the successive positions before resolving a move that could offer several opportunities. If those steps are unclear, agree a shift to Tactical Mode and sketch the relevant area in 2 m Spaces. Follow Combat's rule for each qualifying completed step. Perception, legal reach, payment and responses still apply each time.
For example, a route might contain three successive legal steps that all remain within a pike's reach. Each can provide a separate opportunity if the attacker still meets the requirements. Describing the whole route in one sentence does not combine those opportunities into one.
Once that positioning question is resolved, the group can return to a broader view, preserving the state under Shifting Scene Modes.
Finding a Comfortable Amount of Detail
Keep the details that help people choose. Use a closer view when reach, route or an area boundary needs it. Return to a broader view when those questions are settled.
Give the group time to ask questions. You can share a recap, ask a player to help sketch the known layout, or take a short pause to find the rule you need. Clear choices and a shared picture give everyone, including you, room to enjoy what happens next.
Summary
- Choose a Scene Kind: Give the Scene a clear start and end. Choose Social, Exploration, Challenge or Combat separately from its Mode.
- Choose a Mode: Begin with Cinematic if unsure. Choose together and use the least detail that keeps the current choices clear.
- Run the scene: Describe the situation, establish relevant positions, hear intent and method, clarify requirements, then resolve and update.
- Use Story Mode: Keep clear relationships such as within reach, across a route, behind cover or within Range. Preserve normal procedures and costs.
- Use Cinematic Mode: Name the Zones, establish adjacency and legal connections, and track important local positions. Use the formal conversions and movement accounting.
- Use Tactical Mode: Establish the relevant Spaces, routes, terrain and areas on a square or hex map. Each Space is 2 m.
- Change Mode: Announce and agree the shift. Preserve established facts, turns, resources, effects and the unused movement fraction.
- Clarify a difficult position: Pause before commitment. Add the detail needed for the next decision; use Tactical steps when successive movement opportunities matter.
- Use turns when timing matters: Any Scene Kind can use sides, turns and Rounds. Track who has acted and which side goes next.
- Start or end combat: Start a Combat Scene when the fight begins and close it when the fight ends. Apply a Scene Reset at both points. Changing Mode on its own does not cause one.