
On this page
The story draws the first blade. The consequences carry it forward.
Combat begins when characters use force against opposition and the order of their actions matters. You might fight to escape, protect someone, seize an object or defeat an enemy.
At the table: Enter combat → take turns → choose a target → move if needed → resolve an Exchange → apply Wounds → return to the story.
Entering Combat
You might be bargaining with a guard, exploring a ruin or crossing a crowded bridge. Then a threat becomes an attack, a creature charges, or someone tries to force their way past. Suddenly, where everyone stands, who acts first and how much time they have can change the outcome. Combat turns help you follow that action, one moment at a time.
If one action settles the danger, resolve it and continue the story. Use combat turns when you need to decide who acts next.
When combat starts, close the current Scene and begin a Combat Scene. Apply a Scene Reset before the opening Activation.
Begin from what was happening just before the fight. Everyone stays where they are. Hidden characters stay hidden until something reveals them. Keep injuries, spent dice and any effects that have not ended.
Who Acts First?
The Guide decides who acts first from what is happening in the story. Finish an action already underway. Otherwise, use the characters' positions and preparations to decide. Speaking first at the table does not make your character act first.
Use the ordinary rules if you need to check whether someone notices a threat or finishes a preparation in time. Do not roll just to decide turn order. If it is still unclear who goes first, a player character goes before an NPC (a non-player character). Players choose between tied player characters; the Guide chooses between tied NPCs.
A shared plan or signal still starts with one character's turn. The others keep their preparations and may respond when the rules allow it. Saying “I attack if he moves” does not grant a free attack; you need a rule that allows that Reaction.
Choose the Scene Mode together. Cinematic Mode is the recommended starting point. Story and Tactical Modes use the same turn rules. Changing Mode preserves the action and its results.
At the bridge — the fight begins. Mira and Orin are speaking to two bandits, Rook and Sable. Mira stands beside Rook; Orin is near the gate. Rook draws his sword and swings at Mira. Nobody has already begun an action that would stop him. The Guide closes the Social Scene and applies a Scene Reset as the Combat Scene begins. “Rook attacks first. We'll stay in Cinematic Mode.”
Finish the Opening Activation
Your turn, also called your Activation, is when you take Tempo: you lead the action. You choose what your character tries next and how many dice to spend. You can take several actions if you can pay for them and stay within your movement and Skill limits.
The action that starts combat belongs to that character's first turn. Before paying for it, follow Taking Your Turn. This includes Refresh, which normally makes their Used Action Dice ready to spend again. Other characters keep their current dice.
Resolve the opening action, any responses and any effects it causes. If the first character can still act, they may finish their turn with their remaining dice, movement and Skill uses. They do not refresh again. If they are stopped or collapse, that result stands.
Already resolved the opening action? Count it as part of that character's first turn and keep its costs and results. They may finish the turn, but do not repeat the action, refresh again or gain more movement. If you missed the Scene Reset, apply it before the next action. If an effect should already have ended, end it before the next action without undoing what happened.
At the bridge — Rook finishes. Rook refreshes at the start of his turn, then pays for his attack. Mira spends Ready Action Dice (AD) to attack back in a Clash. Resolve both attacks and their effects. Rook is still able to act and has dice left, so he may continue. If he attacks again, he pays again.
Rook holds Tempo during his turn. Mira's Clash was a response to his attack. Mira still gets her own turn, when she will hold Tempo.
Turns and Rounds
A side is a group working together. The heroes and their allies form one side; the bandits form another. A friendly NPC belongs with its allies, even though the Guide plays it. Characters can share a side while standing in different Zones.
A Round gives each character one turn. It covers about ten seconds of overlapping action; each character does not add another ten seconds.
Use a turn tracker to mark who has acted this Round and which side goes next. Any Scene Kind can use a turn tracker. See Spell Timing for how short spells use Rounds and carry into a fight.
Who Goes Next?
After the opening character finishes, the other side chooses someone who has not taken a turn this Round. That character takes Tempo for their turn. Keep going back and forth:
One hero → one enemy → one hero → one enemy.
The character who started the fight has already taken their turn in the first Round. For a crowd, choose an NPC group whose members take their turns one after another.
Once a character's turn begins, it counts as their turn for that Round, even if they cannot act. Responding during someone else's turn does not count as taking your own turn.
Skip a side with no turns left. The other side finishes its remaining turns. A lone foe gains no extra turns or Refreshes because several heroes oppose it.
Choosing and Changing Your Order
Agree on an order for each side. Follow it unless someone wants to change it.
Each time the heroes' side goes, the players may choose a different hero who has not acted yet. The player who would otherwise go next must agree to let that hero go first. Nobody can take another player's turn away. The Guide makes this choice for an allied NPC.
Letting an ally go first does not begin your turn or refresh your dice. You act at a later chance this Round. Once your turn starts, finish it; you cannot save half for later.
The Guide may also change the order of NPCs on their side. Next Round, follow the order each side used this Round unless someone changes it. Players may ask for a recap or a pause before choosing.
At the bridge — the heroes choose. Rook finishes. Mira was going to act next, but Orin says, “Let me reach the gate. I can stop more bandits coming through.” Mira agrees, so Orin takes his turn.
The bandits go next. Rook has acted, so Sable takes her turn. Then Mira takes hers.
The first Round is Rook → Orin → Sable → Mira. Everyone has taken one turn.
Ending a Round
When everyone has taken their turn, apply any effects that happen at the end of a Round. End any effects that last only until Round end. Then begin the next Round, with one new turn for each character.
The side that was due next still goes next. Do not restart automatically with the character who began the fight. Starting a new Round does not refresh everyone's dice. Each character refreshes at the start of their own turn.
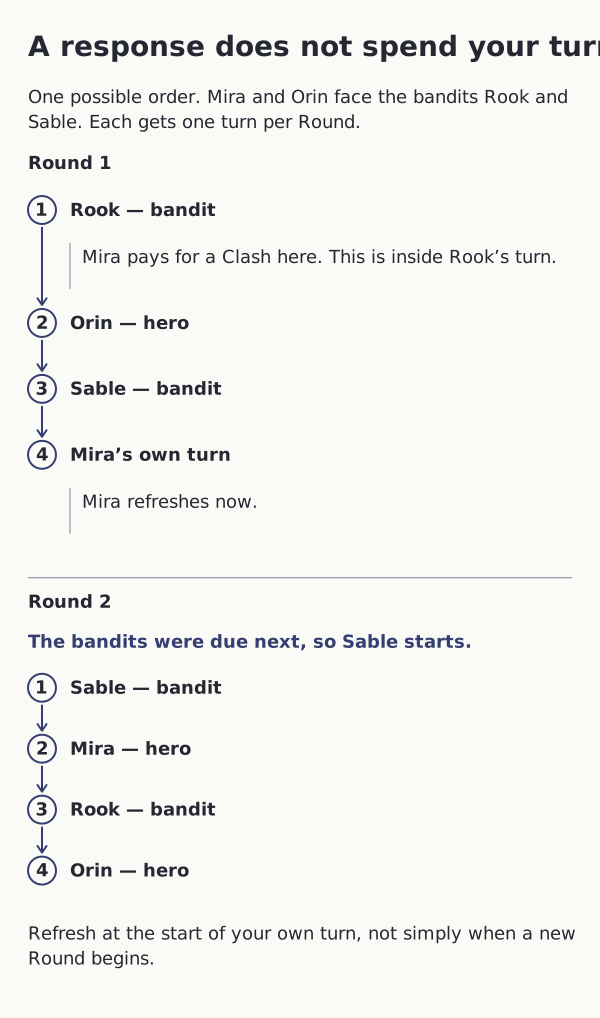
At the bridge — Round two. Mira acted last, so the bandits go next. The Guide chooses Sable. Orin went before Mira last Round, but agrees that Mira should act now. Rook follows, then Orin.
Round two is Sable → Mira → Rook → Orin. Both sides changed their order. Each character still received one turn.

Read the diagram as text
One possible order for Mira and Orin against the bandits Rook and Sable. Each character has one turn per Round.
- Rook’s opening attack is part of his first turn. Mira pays for a Clash during it, but this is an Exchange Response, not Mira’s turn.
- After Rook, the heroes agree that Orin acts. Sable follows, then Mira takes her own turn and refreshes at its start.
- Round 1 ends after everyone has taken one turn: Rook, Orin, Sable, Mira.
- The bandits are already due after Mira. They remain next across the Round boundary, choosing Sable. The example Round 2 is Sable, Mira, Rook, Orin.
Result: Mira still gets her own turn in Round 1. Sable starts Round 2 because the bandits’ side was next.
- These names show one possible order, not fixed initiative. Changing player order needs the next player’s agreement and cannot split an Activation.
- Responses have their normal costs and requirements. They do not consume an own turn or proactive Skill use. The opening attack grants no extra Refresh.
- A Round is about ten seconds of overlapping action, not ten seconds for each separate turn.
Taking Your Turn
Your turn is your Activation. During it, you hold Tempo: for this moment, you lead the action. Your choices shape what happens next. You might press an attack, move to protect an ally or try to escape. You choose what to attempt; the rules and rolls decide the result.
At the start of your turn, follow these steps. Skip anything that does not apply to your character.
- Check effects that happen when your turn starts. If a trait, spell or Condition tells you to do something now, follow its instructions.
- End effects whose time has run out. For example, a bonus lasting “until the start of your next turn” ends now. If one of your Magic Dice was holding an effect that ends now, move that die to Used AD. It can refresh in step 4. See Ongoing Effects.
- Check whether you recover. If you are Unconscious or Critical, make the Recovery Roll in Death & Recovery. If you were already Dying, follow Last Gasp.
- Refresh your Action Dice. Move your Used AD back to Ready so you can spend them again. If your Refresh is impaired, roll for it instead. Wounded dice stay Wounded. Magic Dice holding other ongoing effects stay where they are.
- Use your Tempo to act, if you can. You decide what your character tries next, the order of your actions and how many dice to spend. Attack, move, help or try something else. Follow Actions and Movement, paying the cost of each action. You may end your turn with dice left.
Other characters may still make legal Exchange Responses, Reactions and trait choices. They must meet the requirements and pay the costs. These are responses to your actions; they do not use their own turn or grant another Activation.
Finish each step and any effects it causes before the next. If a rule gives a different time for its effect, follow that time. Even if you cannot act, you still take the steps that apply to you. Becoming Dying during this turn does not cause an immediate Last Gasp; wait until your following turn. If you become Deceased, stop here.
When you finish acting, apply or end any effects due at the end of your turn or Activation. This includes Lingering Harm: unless its rule says otherwise, take 1 Wound from each source still affecting you. If a creature's rule gives it a turn after yours, it goes next; see Companions and Servants. Otherwise, pass to the other side.
Example: a spell ends. Senna casts a protective spell that lasts until the start of her next turn. When that turn starts, the protection ends. Her Magic Die holding it becomes Used AD, then returns to Ready AD during Refresh. Senna can spend it as an Action Die. Preparing it as a Magic Die again requires Trance.
Skill Level In Combat
An action you start during your own Activation is a proactive action. Your Skill Level limits how often you can use that Skill this way:
| Skill | Proactive uses per Activation |
|---|---|
| Melee | Melee Skill Level + 1 |
| Ranged | Ranged Skill Level + 1 |
At Skill Level 0, you still have one proactive use. Melee uses include attacks, shoves, trips, feints, disarms and grapples. Ranged uses include ranged attacks and other actions that use Ranged to target something at a distance.
You can add Boost AD up to the Skill Level used for that roll, if you can pay for them. Skill Level alone does not let you reroll dice. Only reroll when Edge or another rule allows it.
Example: Mira has Melee level 3. She may initiate up to four Melee actions during her Activation and add up to 3 Boost AD to a Melee roll, if she can pay. A Clash response during someone else's turn does not use one of those four actions.
Choosing a Target
Name your target and check the attack from your current position before paying. Move first if you need to get closer or find a clear shot. Then resolve the normal Exchange; being a legal target does not guarantee a hit.
Melee Targets
Your weapon must reach the target without an obstruction stopping it. In Story and Cinematic Modes, agree who is within that reach. Reach Rating is not metres or a number of Zones. Sharing a Zone does not put everyone within reach. An open Zone boundary does not change it.
In Tactical Mode, Reach Rating 1 reaches up to one Space; ratings 2 and 3 reach up to two and three Spaces. A spear can strike two Spaces away, but a Reach Rating 1 sword cannot Clash back from there. Full Guard may still be legal. See Melee Reach.

Read the diagram as text
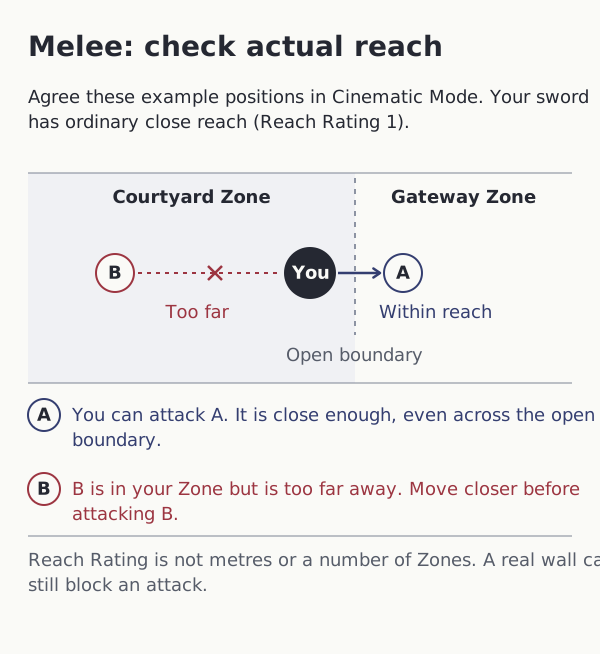
This Cinematic example uses an arming sword with Reach Rating 1. The courtyard and gateway have an open boundary. The positions have been agreed before the attack.
- You stand beside the courtyard's open boundary. Target A stands just across it, within your sword's ordinary close reach. You may declare a legal Melee attack against A.
- Target B is farther away in your own courtyard Zone, outside your sword's reach. You must move closer before attacking B with that sword.
- The open Zone boundary changes neither creature's actual position nor your weapon's reach. A real wall or other obstruction would still matter.
Result: Actual positions and weapon reach determine a legal Melee target. Sharing a Zone does not put every creature within reach.
- In Story and Cinematic Modes, Reach Rating 1 means ordinary close or adjacent melee reach. Reach Rating is not metres or a number of Zones.
- In Tactical Mode, Reach Rating 1 reaches up to one Space; Reach Ratings 2 and 3 reach up to two and three Spaces.
- This sketch is an example of agreed positions, not a fixed reach template. A legal target still follows the normal attack payment, response and roll.
Ranged Targets
You need the target's current location, a clear attack path and a ready weapon with any required ammunition. Attacking a target you can locate exactly but cannot see has Disadvantage. A solid wall still stops the shot. Ranged Exchanges explains visibility, Loading and return attacks.
Up to Effective Range, no range penalty applies. Beyond it, up to Maximum Range, the attack has Disadvantage. Beyond Maximum Range, the weapon cannot target the creature. Partial cover gives Disadvantage; full cover prevents targeting unless bypassed. Shooting while engaged in melee also has Disadvantage. Sharing a Zone alone does not cause that penalty.
Use the current Mode to establish the distance:
- Story: agree the target's range relationship.
- Cinematic: convert the weapon's ranges to Zones and count the fewest adjacent Zone steps. A walking route can be longer; cover and obstructions still matter.
- Tactical: convert the ranges to 2m Spaces and count the direct distance, including diagonal steps. Check the actual attack path.
See Distance & Range for these measurements. A spell follows its own targeting rules in Magic.
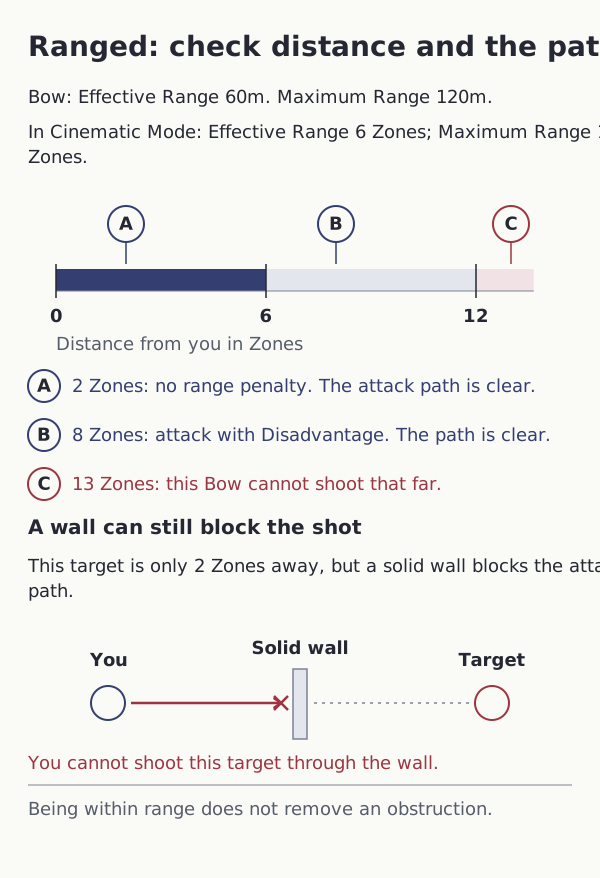
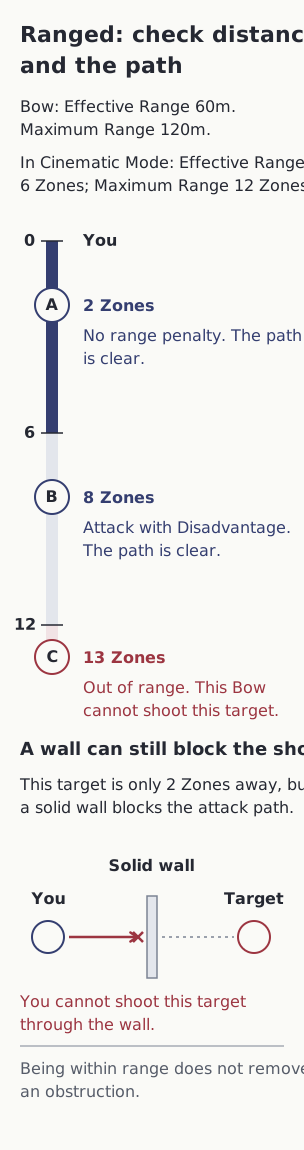

Read the diagram as text
A Bow has Effective Range 60m and Maximum Range 120m. In Cinematic Mode these are 6 and 12 Zones. The bow is loaded, has ammunition and the attacker knows each target's current position.
- A target 2 Zones away with a clear attack path is within Effective Range. No range penalty applies.
- A target 8 Zones away with a clear path is beyond Effective Range but within Maximum Range. The attack has Disadvantage.
- A target 13 Zones away is beyond Maximum Range. This Bow cannot target it.
- A target 2 Zones away behind a solid wall cannot be shot through that wall. Being within range does not remove the obstruction.
Result: Check both distance and a clear attack path. Being in range alone does not make the shot legal.
- Partial cover gives Disadvantage. Full cover prevents the attack unless a rule or the method bypasses it.
- Shooting while engaged in melee gives Disadvantage. Merely sharing a Zone is not that condition.
- The Bow's Tactical ranges are 30 and 60 Spaces. In Story Mode, establish the equivalent range relationship.
- An unseen target needs a known current location and is attacked with Disadvantage. A last known position is not enough if the target could have moved unseen.
Movement in Combat
During your own turn, you may move, attack, then keep moving if still able. Finish the Exchange and its consequences first. The attack has its own cost and Skill use; it restores no movement. Moving during another turn needs a specific rule.
Choose Your Movement
Choose one normal movement mode for the turn. These costs are before discounts and other modifiers:
- Walk: 0 AD, up to your Base Movement.
- Run: 1 AD, up to twice your Base Movement.
- Sprint: 2 AD, up to three times your Base Movement plus 2m per level in its governing Skill. Choose Athletics or Acrobatics from your method and route, and spend one proactive use of that Skill.
Ordinary movement has no roll. Pay for Run or Sprint once, even when divided around attacks. Neither ends your turn: you may still take other legal actions you can pay for. See Movement for risky manoeuvres, terrain, Conditions and carried load.
Check Opportunity Attacks before passing an opponent. A step that stays within their reach can trigger one; entering or leaving reach alone does not. Moving behind a miniature gives no automatic hiding or Advantage.
Sprinting gives ranged attacks against you Disadvantage only while you are moving, excluding a straight approach towards or retreat directly away from that attacker. Stopping to attack ends that modifier until you resume moving in that Sprint.
Cinematic Movement
Track your Zone and your position within it: at the doorway, beside a foe or behind a pillar. Agree the route, destination and known risks before moving.
Convert the full allowance using Zone Snapping. An ordinary crossing into a connected adjacent Zone spends 1 Zone of movement. Arrive at the agreed entry position; reaching a foe or cover farther inside can cost more.
Within a Zone, agree the distance: each metre spends 0.1 Zones from that same allowance. Repositioning still counts even when you stay in the Zone. See Cinematic movement for route costs and allowances that snap to 0 Zones.
Example: Mira's 10m Base Movement gives a 2-Zone Run. She spends 1 Zone entering the hall, then 0.4 approaching Rook by 4m. She pays for and resolves her attack. Still able to move, she travels 3m to cover for another 0.3 Zones. She has 0.3 Zones left, too little for another ordinary crossing. Her 1-Zone Walk would only have reached the hall entry.
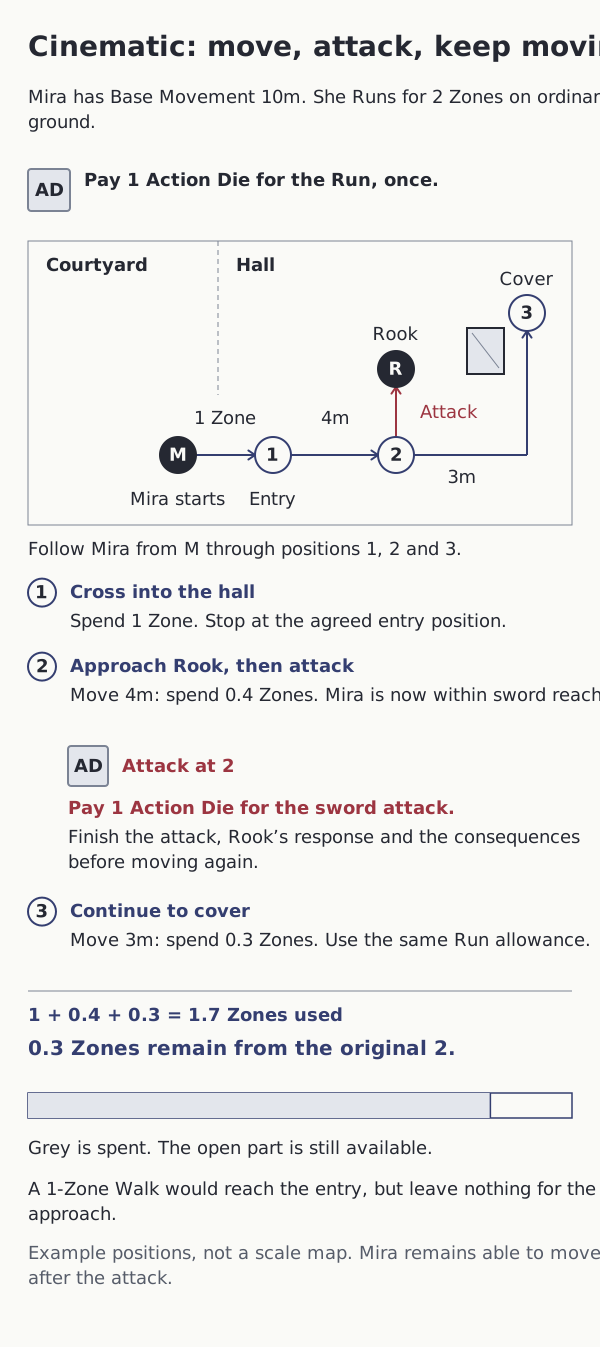


Read the diagram as text
Mira has Base Movement 10m. On ordinary ground, her Run costs 1 Action Die and gives 2 Zones of movement. She can pay for her attack and remains able to move after its Exchange.
- Pay the Run's 1 Action Die once. Cross from the courtyard into the connected hall for 1 Zone of movement, arriving at the agreed entry position.
- Move 4m from the hall entry to the agreed position where Mira's sword can reach Rook. That local approach spends 0.4 Zones.
- Pay for and resolve the attack separately, including Rook's response and any consequences. An ordinary unboosted arming-sword attack costs 1 Action Die. The attack does not restore Mira's movement.
- Mira can still move. She travels 3m to the agreed cover position, spending another 0.3 Zones. Do not pay for the same Run again.
- The route spent 1 + 0.4 + 0.3 = 1.7 Zones. Mira has 0.3 Zones left, which is too little for another ordinary Zone crossing.
Result: One Run pays for the whole route. The attack has its own cost. Mira finishes in cover with 0.3 Zones of movement left.
- The Zone connection and local positions are agreed before movement. Zones are not fixed 10m squares; the sketch is not to scale.
- A 10m Walk gives only 1 Zone. It could pay for this crossing, but no movement would remain for the approach farther into the hall.
- The route must be legal. Apply terrain, Conditions, reactions and any risky-manoeuvre procedure when they actually matter.
- Entering or leaving melee reach alone does not trigger an Opportunity Attack. Successive steps that remain within reach can; clarify those steps before moving.
Tactical Movement
Follow a legal map route. Each Space is 2m; an adjacent diagonal counts as one Space. Deduct each entered Space and any terrain cost. Do not cross blocked Spaces or barriers.
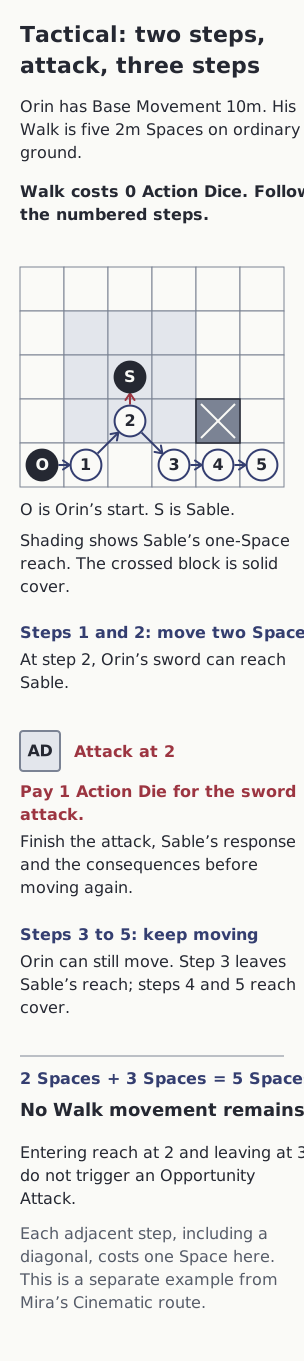
Example: In a separate fight, Orin's 10m Walk gives five Spaces. He moves two, attacks an adjacent foe, then uses the remaining three to reach cover. Pay for the attack separately. No Walk movement remains.
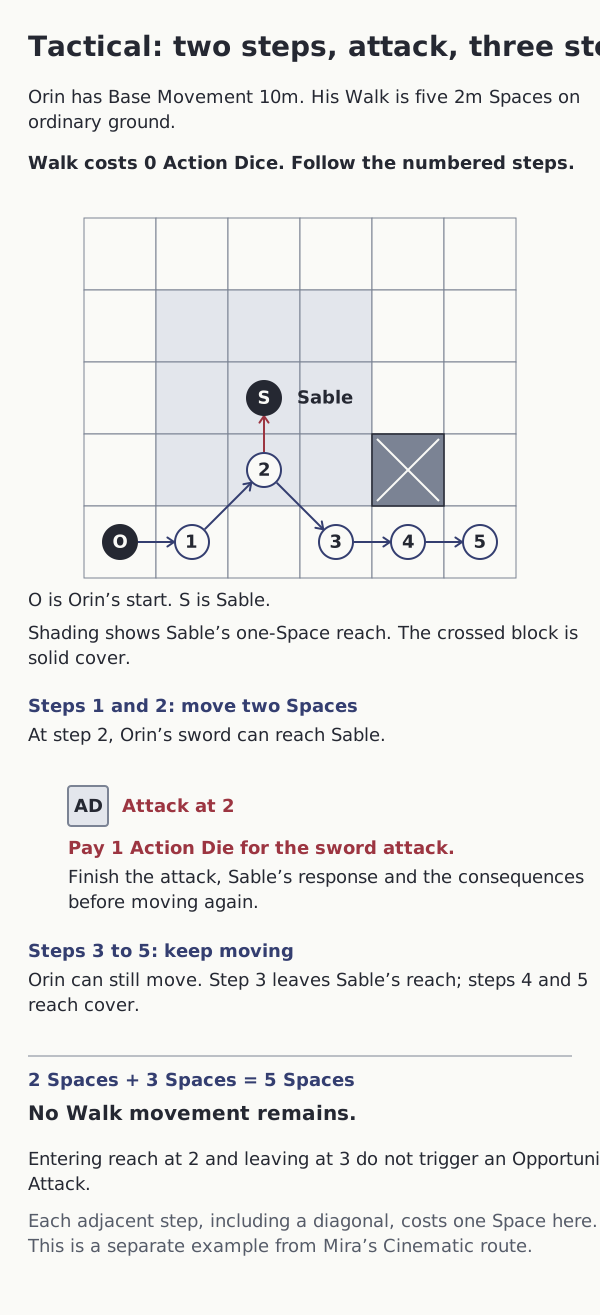

Read the diagram as text
In a separate fight, Orin has Base Movement 10m. His Walk allows five 2m Spaces on ordinary ground and costs 0 Action Dice. His arming sword and Sable's melee weapon each have Reach Rating 1.
- Follow steps 1 and 2 from Orin's starting Space. At step 2 he is adjacent to Sable, so his Reach Rating 1 sword can reach her.
- Pay for and resolve Orin's attack and Sable's response before moving again. This ordinary unboosted sword attack costs 1 Action Die; Walking itself has no roll.
- Orin remains able to move. Step 3 leaves Sable's one-Space reach. Leaving her reach alone does not trigger an Opportunity Attack.
- Continue through steps 4 and 5 to the marked cover position. All five steps use the same Walk allowance. No Walk movement remains.
Result: Orin uses two Spaces before the attack and three afterwards. The attack is paid separately and grants no new movement.
- This is a different route from the Cinematic example, not a conversion of it. Each entered Space costs one step on this ordinary route.
- An adjacent diagonal counts as one Space. Do not cross blocked Spaces or barriers.
- Moving between two Spaces that are both within an opponent's reach can trigger an Opportunity Attack after that step. This route enters reach at step 2 and leaves it at step 3.
- A position behind a miniature does not automatically hide you or grant Advantage. Cover depends on the actual obstruction and attack path.
Story Mode and Changing Mode
In Story Mode, agree whether your allowance can reach the foe, cover or escape route. Keep reach, terrain and barriers. If positions or successive steps are unclear, sketch them or use Tactical Mode before committing.
A Mode change keeps the established positions and the fraction of movement remaining. It grants no fresh movement, turn or Refresh.
NPC Groups
For a crowd, the Guide puts NPCs into named groups. When that side goes, choose one group with turns left. Its members take their turns one after another, then pass back to the other side.
Start with as many groups as there are opposing characters with separate turns in the order. Against four heroes, for example, aim for four NPC groups. If there are fewer NPCs, each can act alone. A companion that acts straight after its owner does not add another group.
Keep the groups roughly even, but use the situation to make them easy to follow. A boss and personal bodyguards might form one group, while minions form two or three others. Archers on a roof might form a group together. An important foe may instead act alone. These are examples, not required formations.
Name the groups and decide who belongs to each before choosing their turns. Keep them fixed for the Round, even if members move, change targets or die. The Guide may change the groups between Rounds and tells the table what changed. Do not reveal hidden creatures to do this.
Each NPC keeps its own dice, costs, turn and Refresh. Finish one member's whole turn before starting the next. The Guide chooses the members' order; attacked characters keep their legal responses. Do not pool dice, combine attacks into one roll or refresh the whole group together.
Four Heroes Against Fifteen Monsters
Mira, Orin, Sera and Tomas face fifteen small monsters. The Guide makes four groups: Gate: 4; Cart: 4; Wall: 4; Steps: 3. The names identify their members, even if they move elsewhere.
Mira starts the fight. One possible Round is:
| Heroes | Monsters |
|---|---|
| Mira takes her turn. | The four Gate monsters take separate turns. |
| Orin takes his turn. | The four Cart monsters take separate turns. |
| Sera takes her turn. | The four Wall monsters take separate turns. |
| Tomas takes his turn. | The three Steps monsters take separate turns. |
All nineteen characters have taken one turn. The monsters' turns were spread through the Round.
If a monster starts instead, only that monster takes the opening turn. The heroes go next. The rest of that monster's group can act when it is the monsters' side again:
One Gate monster → Mira → the other three Gate monsters → Orin → Cart group → Sera → Wall group → Tomas → Steps group.
The opening monster does not act twice. The Guide could also choose a different group before the rest of the Gate group.
Grouping spreads a crowd's turns through the Round. Every monster still gets one turn. If one side runs out of turns first, the other finishes its remaining turns. One hero against fifteen monsters still faces fifteen enemy turns each Round.
Ending Combat
When the fight and immediate danger are over, close the Combat Scene and apply a Scene Reset. If play continues, begin the next Scene without combat turns. Enemies may surrender, people may escape, or the heroes may achieve their aim without defeating everyone. Unused turns do not grant extra attacks after the fight ends.
Keep track of time while someone needs urgent recovery, a hazard remains dangerous or an effect is about to end. Use turns if they help you follow what happens next. Keep injuries, dice and any effects that have not ended.
At the bridge — back to the story. Orin shuts the gate. Rook drops his sword and Sable surrenders. The Guide closes the Combat Scene and applies a Scene Reset. The players begin a new Scene to decide what to do with the bandits. If Mira needs urgent help, they still resolve it.
Scene Reset
Apply a Scene Reset when combat starts or ends. It also happens when the Guide announces another change of Scene after the action and any urgent consequences are settled. Changing Scene Mode on its own does not cause a Scene Reset.
Apply only rules that name a Scene Reset. A Scene Reset does not automatically heal anyone, refresh dice or restore trait uses.
When a Scene or fight ends, also check rules with deadlines tied to it. For example, a Continuation restriction ends with that fight. Spells keep their own timing and ending conditions.
Combat Exchange Flow
A Combat Exchange resolves an attack and the defender's response together. A defender who knows about the attack may guard, attack back or choose not to respond. Compare their rolls to find out what happens.
For spellcasting, follow Magic and the spell's procedure. Use an Exchange only when that rule calls for one.
- Declare the attack. Name the target and a legal Melee or Ranged attack. Check reach, range and targeting requirements. Choose its Damage Vital before committing dice.
- Check the Skill limit. If this is an attack during your own Activation, you need a proactive use left for that Skill. A Reaction follows the rule that allows it.
- Choose Boost and pay for the attack. Start with the weapon's Base Attack Cost and add any Boost AD, up to your attacking Skill Level. Apply discounts first, then any rule that changes the cost, such as Slowed. You must be able to pay the full cost. Follow Paying Costs and Rolling Dice.
- Choose and pay for the response. An aware defender who can act chooses a response from the table below. If they Clash, they declare their attack and choose its Damage Vital before paying. They choose any Boost, then apply their own discounts and cost changes before paying the full cost.
- Roll and compare. Roll the attack or response's normal dice, chosen Boost dice and any bonus dice a rule grants. Extra AD paid only because a cost increased do not add dice to the roll. Apply Edge and any allowed rerolls, then compare the final totals.
- Resolve harm. If the winner can deal damage, calculate and apply Wounds. Resolve collapse, any Continuation Check and triggered effects before continuing.
How many dice do you roll? The weapon's Base Attack Cost gives your starting number of dice. Add the dice you chose for Boost and any bonus dice granted by a rule. Paying more because of a Condition does not add roll dice.
Example: An arming sword has a Base Attack Cost of 1 AD. Add 2 Boost AD: you pay 3 AD and roll 3 dice. While Slowed, you pay 6 AD for that same attack, but still roll 3 dice. Only 2 of them count as Boost.
Exchange Responses
The table gives costs before discounts and other cost changes, including Slowed. Use the defender's own costs. Full Guard and Clash follow the same payment steps as attacks. These are Exchange Responses: they do not use your own turn or a proactive Skill use, and they are separate from Reactions.
| Response | Cost | Skill | Can deal damage? |
|---|---|---|---|
| No Response | 0 AD; no roll | None | No |
| Full Guard | 1 AD + optional Boost | Melee against Melee; Acrobatics against Ranged. Roll with Advantage. | No |
| Clash | Response weapon's Base Attack Cost + optional Boost | Melee against Melee; Ranged against Ranged | Yes |
No Response
Choose No Response to save effort. It also applies if you are unaware, unable to act or unable to make and pay for any legal response. Having no Ready AD does not prevent a response that a specific rule lets you pay entirely with MD, such as Elemental Lash.
Make no roll. The attacker rolls against target number 0. Cover, range, visibility, Conditions and other rules still apply; they may modify or prevent the attack.
Full Guard
Full Guard focuses on stopping the attack. Use Melee against a Melee attack, or Acrobatics against a Ranged attack. You have Advantage on your Full Guard roll. Start with 1 AD, then add any Boost up to that Skill Level. Apply any rules that change the cost before paying. Extra payment adds no roll dice.
Follow the normal Edge rules: another Advantage adds nothing, and Disadvantage cancels Advantage. At Skill Level 0, you can still roll the one base die with Advantage, but cannot Boost.
If your final total equals or exceeds the attacker's, stop the attack. Otherwise, the attacker calculates Wounds normally. Full Guard never deals damage in that Exchange.
Example: Rook uses Full Guard against Mira's sword. His total equals hers, so neither suffers harm. Against a ranged attack, his Full Guard would require Acrobatics instead of Melee.
Clash
Clash lets you attack back within the same Exchange. Your weapon must be able to reach the attacker, and you must meet its other attack requirements. Declare the attack and choose its Damage Vital. Then pay its cost and any chosen Boost, including any discounts or cost changes.
Both characters roll Melee in a Melee Clash, or Ranged in a Ranged Clash. Only the higher total deals damage, using that character's own weapon and Damage Vital. A tie means neither lands a clean hit.

Read the diagram as text
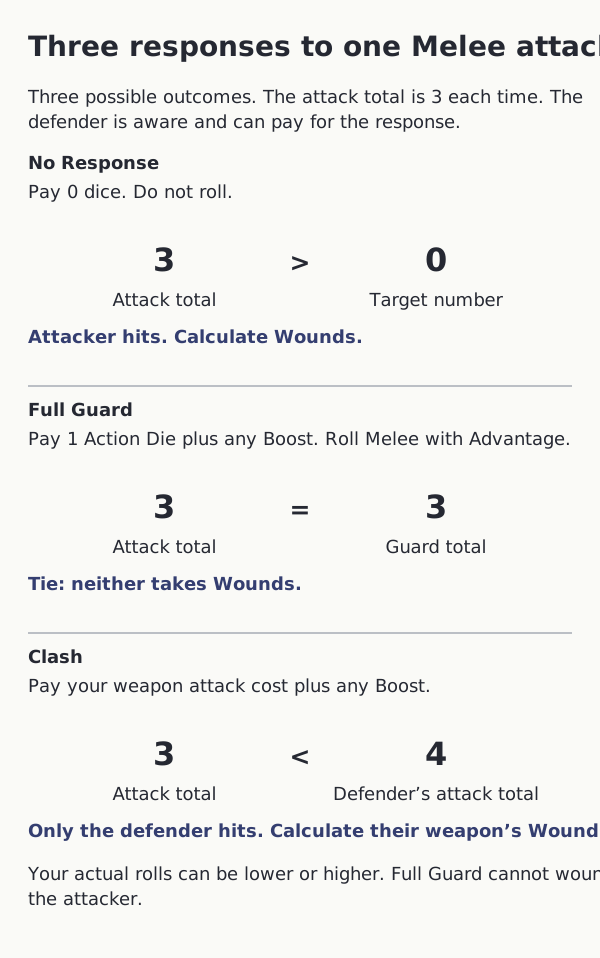
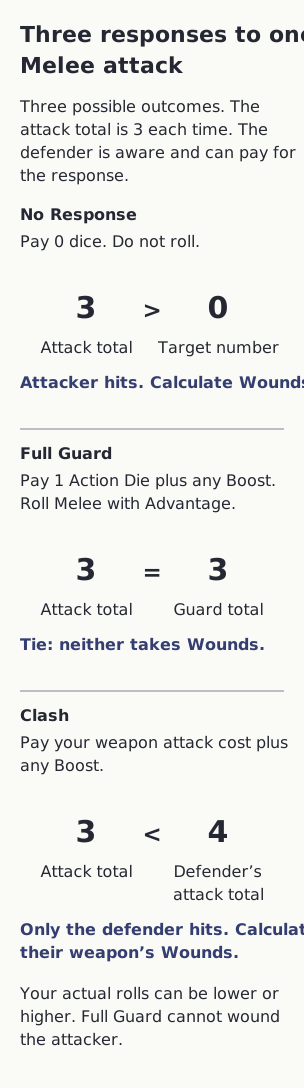
Three possible outcomes. The attacker’s total is 3 in each example. Your roll can be lower or higher. The defender is aware and can make and pay for the chosen response.
- No Response costs zero and rolls nothing. Attack total 3 beats target number 0, so the attacker hits and calculates Wounds.
- Full Guard against Melee uses Melee with Advantage. Its example total 3 ties the attacker’s 3, stopping the attack. It cannot wound the attacker.
- A legal Clash pays for the defender’s own weapon attack plus any Boost. The example defender’s attack total 4 beats 3 by one. Only the defender hits and calculates their own weapon’s Wounds.
- Use the actual final totals in play. Neither guard total 3 nor Clash total 4 is guaranteed by choosing that response.
Result: A tied Full Guard causes no Wounds to either character. Clash’s illustrated 4 is a sample result, not a promised benefit.
- Apply each defender’s own discounts, cost modifiers, weapon reach and other attack requirements. An unaware defender follows No Response.
- Against a Ranged attack, Full Guard uses Acrobatics and weapon Clash uses Ranged. Their specific legality rules still apply.
- Exchange Responses are separate from Reactions and do not use a proactive Skill use or your own turn. Do not add a separate resistance roll.
Melee Exchanges
Each declared attack must be within its weapon's reach. The attacker uses Melee; the defender uses Melee for either Full Guard or Clash.
Ranged Exchanges
To attack, you need a valid target, a clear path for the attack (line of effect), any required ammunition and a ranged weapon ready to fire. You normally find the target by sight.
You may attack a creature you cannot see if another sense or reliable information tells you exactly where it is now. Your attack has Disadvantage. This includes attacking while Blinded or attacking an Invisible creature whose position you know. Its last known position is not enough if it could have moved unseen. Check with the Guide before committing dice.
If you do not know where it is, you cannot target it directly. Knowing its position does not let a shot pass through a wall or other solid barrier. Area effects follow their own targeting rules. If a spell says you must see its target, you still must see it.
- Within Effective Range, range adds no penalty.
- Beyond Effective Range but within Maximum Range, your attack has Disadvantage.
- Beyond Maximum Range, you cannot target that creature with the weapon.
Apply these checks to each character's own attack in a Ranged Clash. Each uses their own weapon's cost, Boost limit, ammunition, damage and Loading state. Firing uses ammunition and resolves Loading whether that character wins or loses.
If you cannot make a legal return attack, you may still choose Full Guard or No Response. Ranged Full Guard uses Acrobatics with Advantage and cannot deal damage. See Range.
Winning An Exchange
Compare final totals: the higher total wins; a tie lands no clean hit. Only an attack or Clash can deal damage. Full Guard prevents harm when it equals or beats the attack, but never wounds the attacker.
The bridge fight, continued: Mira attacks Rook. She commits 3 AD; he answers with a 2 AD Clash. Mira rolls 4 dots and Rook rolls 2. Mira wins by 2 and proceeds to Calculating Wounds.
Calculating Wounds
When an attack, spell or other effect hits, use the steps below unless its rule tells you to calculate damage differently.
Start with how much the attack won by (Hit Margin). Add the attack's damage (Strike Rating), then subtract the target's protection (Protection Rating). The result is the Wound Margin. Look it up in the Wound Conversion table to find how many Wounds the target takes.
Hit Margin
Subtract the loser's final roll total from the winner's. If an attack rolls against a fixed target number, subtract that number from the attacker's total instead.
For example, a winning total of 4 against a total of 2 gives Hit Margin 2. Keep the exact result; do not round it.
Choosing a Damage Vital
Your Damage Vital is the Vital that adds to your attack's damage. Use the table below. If two Vitals are allowed, choose one when you declare the attack, before committing its dice.
Keep that choice for the whole attack, including when checking a trait's requirements. This applies to both initiating attacks and attacking Clash responses.
| Ordinary attack | Damage Vital |
|---|---|
| Melee attack with a weapon not marked Heavy | Strength or Agility |
| Melee attack with a weapon marked Heavy | Strength |
| Thrown weapon attack | Strength or Agility |
| Shot from a bow, crossbow, sling or other loaded-projectile weapon | Agility |
The ordinary Unarmed Strike follows the first row. A weapon with more than one use follows the row for the attack you declare.
The weapon's Damage Vital Cap limits how much of that Vital adds to Strike Rating. It does not change which Vital you may use. Find each weapon's cap and Heavy marker in Equipment.
A spell, trait, weapon or creature rule may name a different Damage Vital or a different way to calculate Strike Rating. Follow that rule at the time it states.
Choosing a Damage Vital does not change the attack's Skill, its Linked Vital, Skill Level or Boost limit. See Skills List.
Strike Rating
Strike Rating tells you how much damage the attack adds before protection. For a weapon attack:
- Compare your chosen Damage Vital with the weapon's Damage Vital Cap. Use the lower number.
- Add that number to the weapon's Weapon Damage. The total is your Strike Rating.
Example: A dagger has Weapon Damage 1 and a Damage Vital Cap of 2. You chose Strength 6, but the cap allows only 2 of it. Add 1 + 2 for Strike Rating 3.
If a spell or effect gives its own Strike Rating or calculation, use that instead. If a trait changes a weapon attack's Strike Rating, calculate the normal rating first, then apply the trait's change.
Protection Rating
Start with the target's armour Soak. Add or subtract any protection changes given by a rule. The result is the target's Protection Rating. For example, leather armour with Soak 1 gives Protection Rating 1 if nothing changes it.
Shields and defensive weapons do not automatically add defence dice or protection. Use their stated traits and any rules for cover or other effects.
Wound Margin
Add Hit Margin + Strike Rating, then subtract Protection Rating. This gives the Wound Margin.
If Wound Margin is 0 or less, the hit causes no Wound.
Wound Conversion
Find the Wound Margin in the left column. The right column tells you how many Wounds to apply.
| Wound Margin | Wounds |
|---|---|
| 0 or less | 0 |
| 1-2 | 1 |
| 3-4 | 2 |
| 5-6 | 3 |
| 7-8 | 5 |
| 9+ | 8 |
Applying Wounds
For each Wound, reduce Vitality by 1 and move one die to Wounded AD:
- Choose a Ready AD or Ready MD.
- Only when neither kind of Ready die remains, choose a Used AD or committed MD instead.
The character taking the Wound chooses which kind of die to lose within that step. A committed MD is a Magic Die holding an ongoing effect. Wounding it ends that effect; the die stays Wounded AD.
If no unwounded dice remain, further Wounds still reduce Vitality (VIT). Check whether the new VIT makes the character collapse.
Example: Wounds during Trance. Senna has 1 Ready AD, 2 Ready MD and 1 Used AD. She suffers 2 Wounds and chooses to move both Ready MD to Wounded AD. If she suffers another Wound, she must take her remaining Ready AD before her Used AD.
After applying Wounds, resolve the target's collapse state, then any required Continuation Check.
Worked Example: One Melee Exchange
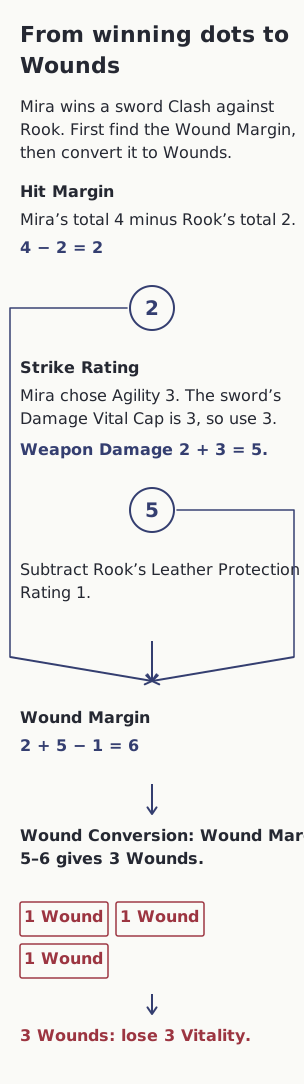
Later in the bridge fight, Mira drives Rook backwards with a fast sword cut: Mira committed 3 AD, Rook answered with a 2 AD Clash, and their final totals were 4 to 2.
- Hit Margin: Mira won by 2.
- Strike Rating: Her arming sword has Weapon Damage 2 and a Damage Vital Cap of 3. She chose Agility 3, so all 3 points fit within the cap. Add 2 + 3 for Strike Rating 5.
- Protection Rating: Rook's leather armour has Soak 1.
- Wound Margin: 2 + 5 - 1 = 6.
- Wounds: Wound Margin 6 converts to 3 Wounds.
Rook has no MD. He loses 3 Vitality and moves 3 AD into Wounded, taking Ready AD first.

Read the diagram as text
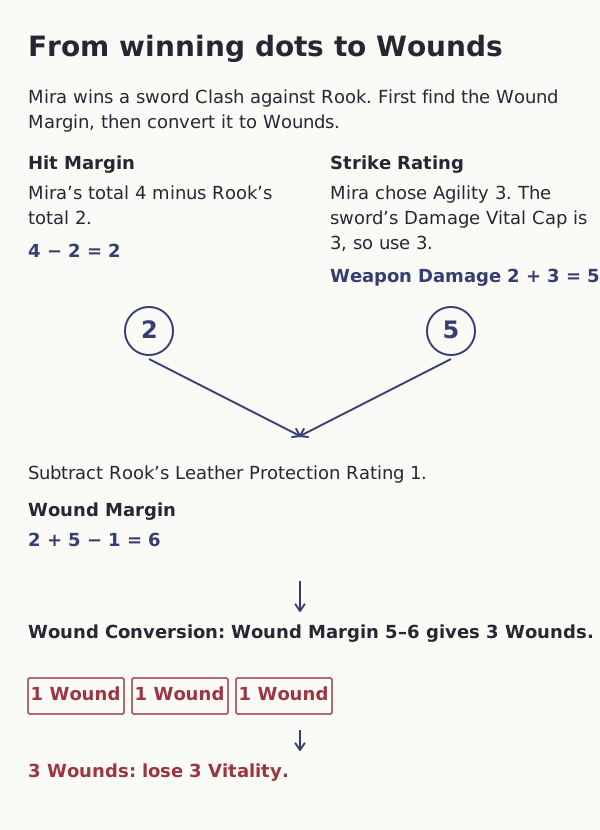
Mira wins a sword Clash against Rook. Work out the margin, then convert that margin to Wounds.
- Mira’s final total 4 minus Rook’s final total 2 gives Hit Margin 2.
- Mira chose Agility 3. The sword’s Damage Vital Cap is 3, so the contribution is 3. Add Weapon Damage 2 for Strike Rating 5.
- Subtract Rook’s Leather Protection Rating 1: Hit Margin 2 + Strike Rating 5 − Protection Rating 1 = Wound Margin 6.
- Use the separate Wound Conversion table. Its 5–6 row gives three Wounds, so Rook loses three Vitality, not six.
- Apply each Wound to an existing die, then resolve collapse before any required Continuation Check.
Result: Wound Margin 6 becomes 3 Wounds through the conversion table. The three identical marks each mean one Wound.
- Each Wound lowers VIT by one and moves one existing die to Wounded AD. Take Ready AD or MD first; only when neither remains may Used AD or committed MD be chosen. Wounding committed MD ends its effect.
- Damage Vital does not change the attack’s Skill or Boost limit. A Wound Margin of zero or below causes no Wound. A specific spell or effect may replace the ordinary weapon calculation.
- See Combat: Applying Wounds and Continuation Checks, and Death & Recovery: Collapse States, for the next procedure.
Worked Example: One Ranged Exchange
Sera has Agility 1 and Cognition 4. She fires a Bow at Veyr through a gap in a broken wall. Her ordinary shot uses Agility. Veyr answers with a legal Ranged Clash. Sera rolls 2 dots and Veyr rolls 1, so Sera wins by 1.
- Hit Margin: 2 - 1 = 1.
- Strike Rating: Her Bow has Weapon Damage 2 and a Damage Vital Cap of 3. Agility 1 is below that cap: 2 + 1 = 3.
- Protection Rating: Veyr's studded leather has Soak 2.
- Wound Margin: 1 + 3 - 2 = 2.
- Wounds: Wound Margin 2 causes 1 Wound.
Sera cannot substitute Cognition just because it is higher; she would need a specific rule allowing it. Veyr has no MD. He loses 1 Vitality and moves 1 AD into Wounded, taking Ready AD first. Both characters used Ranged. If Veyr had chosen Full Guard, he would have rolled Acrobatics with Advantage and could not have wounded Sera.
Harm Types and Lingering Harm
Harm Domains And Types
Every source of Wounds has a Harm Domain and Harm Type. The Domain is the broad family; the Type names the harm. Write them together, such as Physical (Piercing) for an arrow. These labels tell you which protection or other rules apply. They do not add rolls or Wounds.
| Harm Domain | Harm Type | Use For |
|---|---|---|
| Physical | Slashing | Cuts and tears from edges, claws, shards, or similar force. |
| Physical | Piercing | Punctures and penetration from points, projectiles, spikes, or similar force. |
| Physical | Impact | Blunt blows, crushing, falls, collisions, pressure, shockwaves, or similar force. |
| Elemental | Fire | Flame, extreme heat, scalding, or burning. |
| Elemental | Cold | Freezing, frost, ice-burn, or extreme cold. |
| Elemental | Lightning | Electricity, lightning, or electrical discharge. |
| Elemental | Acid | Caustic, corrosive, or dissolving substances. |
| Affliction | Bleeding | Ongoing blood loss. |
| Affliction | Poison | Venom, toxins, and poisonous substances. |
| Affliction | Disease | Illness, infection, and harmful parasites. |
| Affliction | Suffocation | Choking, drowning, strangulation, or lack of breathable air. |
| Affliction | Exhaustion | Overexertion, starvation, dehydration, or sleep deprivation. |
| Supernatural | Necrotic | Deathly decay, withering, or the draining of life force. |
| Supernatural | Psychic | Direct harm to thought, perception, memory, or emotion. |
| Supernatural | Radiant | Divine or celestial power that sears, judges, or purges. |
| Supernatural | Spirit | Direct harm to a soul, spirit, or incorporeal essence. |
| Supernatural | Arcane | Raw magic or reality distortion with no more specific Type. |
Use the Domain and Type named by the rule. Where a choice is needed, the Guide chooses the closest match from the table before applying any rules that depend on the harm's kind.
Choose the labels for what actually hurts the target. An enchanted sword can still cause Physical (Slashing) harm; a conjured flame causes Elemental (Fire) harm. Stone shards may cause Physical (Piercing), a thunderclap Physical (Impact), and drowning Affliction (Suffocation).
Give each batch of Wounds one Domain and Type. If an effect causes two separate kinds of harm, resolve each separately. Use the listed Types. A rule naming only a Domain applies to every Type in it.
Harm Types and Conditions are separate. A Harm Type does not automatically impose a Condition. A Condition causes Wounds only if its rule says so. Poison could impose Disadvantage without causing Wounds.
Lingering Harm
Lingering Harm is a Condition that causes Wounds over time. Its Form names what keeps hurting you, such as Lingering Harm: Bleeding. Note what caused it. Unless its rule says otherwise, at the end of each of your turns, take 1 Wound from each source still affecting you.
| Form | Default Harm Classification |
|---|---|
| Bleeding | Affliction (Bleeding) |
| Burning | Elemental (Fire) |
| Poisoned | Affliction (Poison) |
The rule causing the harm may change its Domain or Type, how many Wounds it causes, when they happen, how long it lasts or how to end it. Follow that rule.
A rule naming a Form affects the Condition itself. A rule naming a Harm Domain or Type affects the Wounds it causes. For example, ending Lingering Harm: Poisoned stops the Condition. Reducing Affliction (Poison) harm reduces the Wounds when they happen, but does not end the Condition.
Separate sources each cause their own Wounds, even with the same Form. Keep track of them separately.
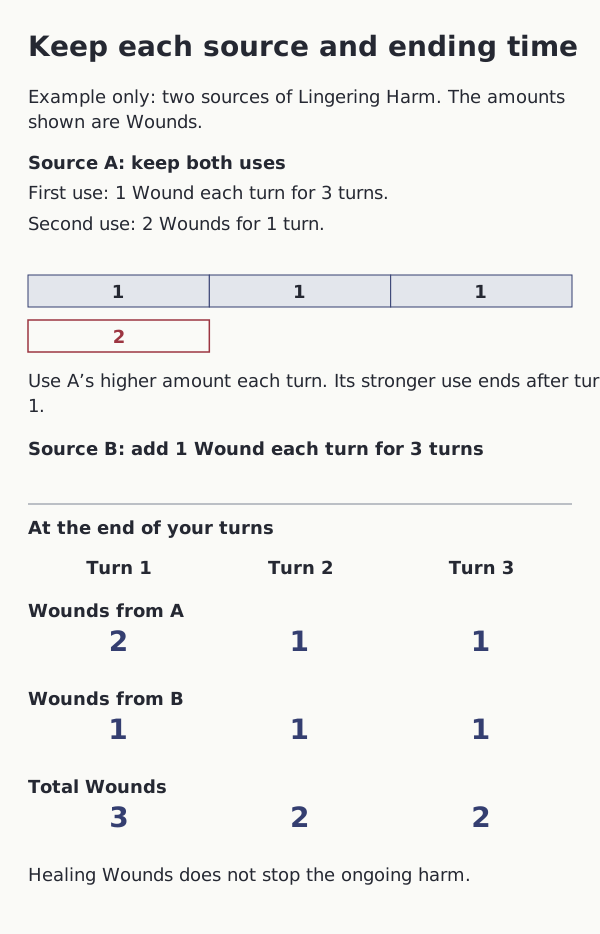
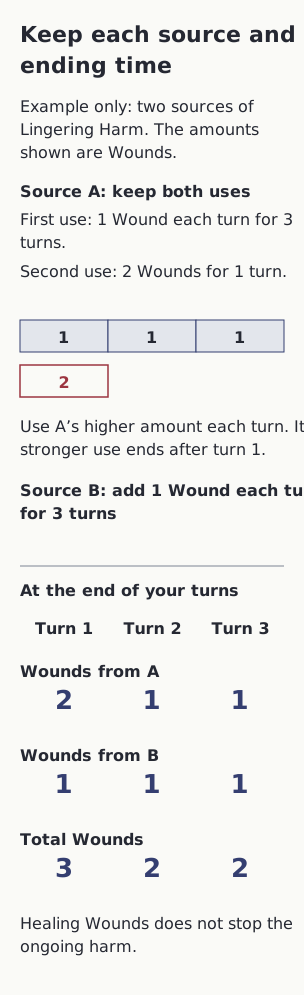
Unless a rule expressly creates separate sources, repeated applications of the same effect from the same creature or hazard count as one source. Keep each application's amount and ending time. At a tick, apply only the greatest amount currently due from that source; a brief stronger application does not lengthen its strength to match a longer weaker one. Different effects or different creatures and hazards are separate sources.
Removing one source leaves the others. A rule that ends a named source ends its remaining applications. Healing Wounds does not itself stop Lingering Harm, and removing the Condition does not heal Wounds already suffered.
Example: If Mira is still bleeding when her turn ends, she takes 1 Wound. Treating the bleeding before then prevents that Wound.

Read the diagram as text
Example only: two sources of Lingering Harm are affecting you. The numbers below are Wounds.
- Keep Source A’s uses separate in the record: one Wound each turn for three turns, and two Wounds lasting only one turn.
- At the end of your first turn, both A amounts are due. Use the higher amount, two Wounds, rather than adding them. Source B adds one Wound: three total.
- At the end of your second turn, A’s stronger use has ended. A causes one Wound and B causes one: two total.
- At the end of your third turn, A and B again cause one Wound each: two total. Each use ends at its own stated time.
Result: A causes 2, 1, 1 Wounds. B independently causes 1, 1, 1. The totals are 3, 2, 2 Wounds at the ends of your turns.
- These are example amounts and durations, not a new poison or creature profile. Follow a source’s stated timing and ending over the defaults.
- Repeated uses of the same effect from the same creature or hazard are one source unless a rule explicitly separates them. Different effects, creatures or hazards are separate sources.
- Ending one named source ends its remaining uses but leaves other sources. Ending Lingering Harm does not heal Wounds already suffered, and healing Wounds does not end it.
Continuation Checks
After Wounds, resolve the character's collapse state. Only a character who remains Active, with VIT above 0, makes a Continuation Check when:
- their Vitality first falls below half their Maximum Vitality in this combat; or
- a single attack or other source causes more Wounds at once than half their Maximum Vitality.
If both apply to the same damage, make one check. Collapsed characters instead follow Death & Recovery.
Roll dice equal to Resilience, free of AD or MD cost. Do not Boost or apply Edge, rerolls or other dice modifiers unless a rule specifically permits them for this check. A Hit scores 1 dot; a Critical scores 2.
- 1 or more dots: pass and continue fighting.
- 0 dots: the character must stop attacking and seek safety. Follow When You Fail below.
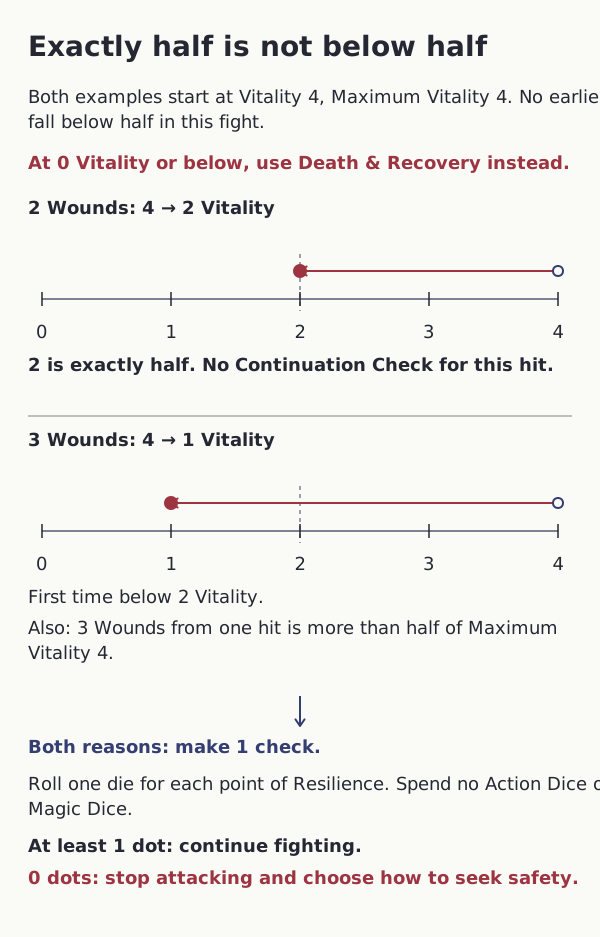
Example: Veyr has Maximum Vitality 4. Three Wounds reduce his VIT from 4 to 1. He remains Active, but meets both triggers, so makes one check. His Resilience is 2. A Hit and a Miss score 1 dot: he passes.
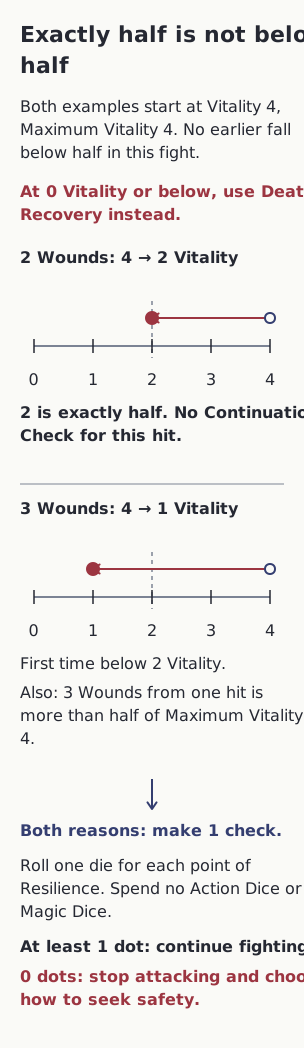

Read the diagram as text
Two independent examples begin at 4 Vitality, with Maximum Vitality 4. The character has not yet fallen below half in this fight.
- Resolve collapse first. At 0 Vitality or below, follow Death & Recovery; do not make a Continuation Check.
- In the first example, two Wounds reduce 4 to 2. Two is exactly half of Maximum Vitality, not below it, and the hit did not cause more than half. No check is required.
- In the separate second example, three Wounds reduce 4 to 1 while the character remains Active. This is the first fall below half, and this single hit caused more than half Maximum Vitality.
- Both triggers together require one check. Roll one die for each point of Resilience at no AD or MD cost.
- At least one dot passes. Zero dots means stop attacking and choose a legal way to seek safety.
Result: 4 to 2 requires no check here. 4 to 1 requires one check, even though both triggers apply.
- Do not Boost or apply Edge, rerolls or other dice modifiers unless a rule specifically permits them for this check.
- The player chooses their character’s possible safety response; the Guide chooses for an NPC. A failure grants no free escape. Normal movement and guard costs still apply.
- After failure, the character cannot attack, Clash or Assist attacks until the combat ends unless a specific rule removes the restriction. Healing or a later pass does not lift it. Healing also does not reset the first-below-half trigger.
When You Fail
The player chooses their character's response; the Guide chooses for an NPC. You might withdraw, surrender, take cover or stop resisting. The Guide checks whether your choice is possible. If it is not, choose another. The Guide cannot choose surrender for a player character.
Until this combat ends:
- You may move, use Full Guard, protect yourself or help someone escape. Follow the normal requirements and pay the normal costs.
- You cannot attack, choose Clash, Assist an attack or use another effect to keep attacking.
If trapped, you may guard or seek cover while looking for a way out. Failing the check does not grant a free escape or make you helpless.
Healing, a new turn or a later successful Continuation Check does not remove this restriction. It ends with this combat, unless a specific rule removes it sooner. Changing your aim while the same fight continues does not start a new combat.
Saying that your character slumps or collapses from fear does not change Vitality or impose Unconscious, Critical or Dying. Those states follow their own rules. Falling to the ground makes you Prone. Players can still use the game's safety tools at any time.
Example: Mira fails at VIT 1 while trapped beside a locked gate. Her player chooses to seek cover and use Full Guard rather than surrender. Orin opens the gate on his turn. Mira can then spend her ordinary movement to escape. Healing her before the gate opens would not let her resume attacking in this fight.
Opportunity Attacks
Moving within an opponent’s melee reach can give them an opening to attack you.
When You Can React
After a creature moves from one Space within your melee reach to another Space within your melee reach, you may make an Opportunity Attack against it.
An Opportunity Attack is a Reaction. You must be able to perceive the creature, make a legal melee attack against it and pay the attack’s cost.
Check each movement step separately:
| Movement step | Opportunity Attack? |
|---|---|
| Outside your reach to inside your reach | No |
| Inside your reach to another Space inside your reach | Yes |
| Inside your reach to outside your reach | No |
The direction does not matter. Moving forwards, backwards or sideways can create the same opening.
The same trigger applies whether the creature moves willingly or is moved by another effect. Follow any specific rule that prevents Reactions to that movement.
Reach alone does not allow an attack through a wall or other obstruction.
Resolving the Attack
The creature completes its step and spends any required movement before you react.
Start a Melee Exchange against it at its new position. You are the attacker in this Exchange, even though it is outside your own turn. This Reaction does not give you a new Activation.
Choose any Boost and pay the attack's cost, including any discounts or cost changes. The moving creature chooses an Exchange Response as usual.
Resolve the Exchange before the creature continues moving or takes another Action. It remains in the Space it reached unless an effect moves it elsewhere.
An Opportunity Attack does not automatically stop movement. After the Exchange, the creature may continue if it has movement remaining and is still able to move.
If several opponents can react to the same step, establish who can react before resolving any attacks. Take them in table order. Before each attack, check that the attacker can still perceive and reach the creature and meet the attack's other requirements. Finish these Reactions before the creature takes its next step.
Further Opportunities
Each step between two Spaces within your reach gives you another opportunity. You may attack again if you still meet the requirements and can pay the cost.
Opportunity Attacks do not consume proactive Melee uses.
If a Class trait or another rule says that movement does not trigger Reactions, it does not trigger Opportunity Attacks.
Moving Around an Opponent
Moving around a creature does not, by itself, hide you from it or prevent it from responding to your attack.
An aware creature can follow your movement. Reaching a position behind its miniature does not automatically grant Advantage or make your attack unseen.
Other Scene Modes
In Story and Cinematic Modes, use the same distinction: entering or leaving melee reach does not trigger an Opportunity Attack. Moving between positions that are both within melee reach can trigger one.
Agree on those positions before resolving the movement. Resolve the Reaction at the position the creature reaches.
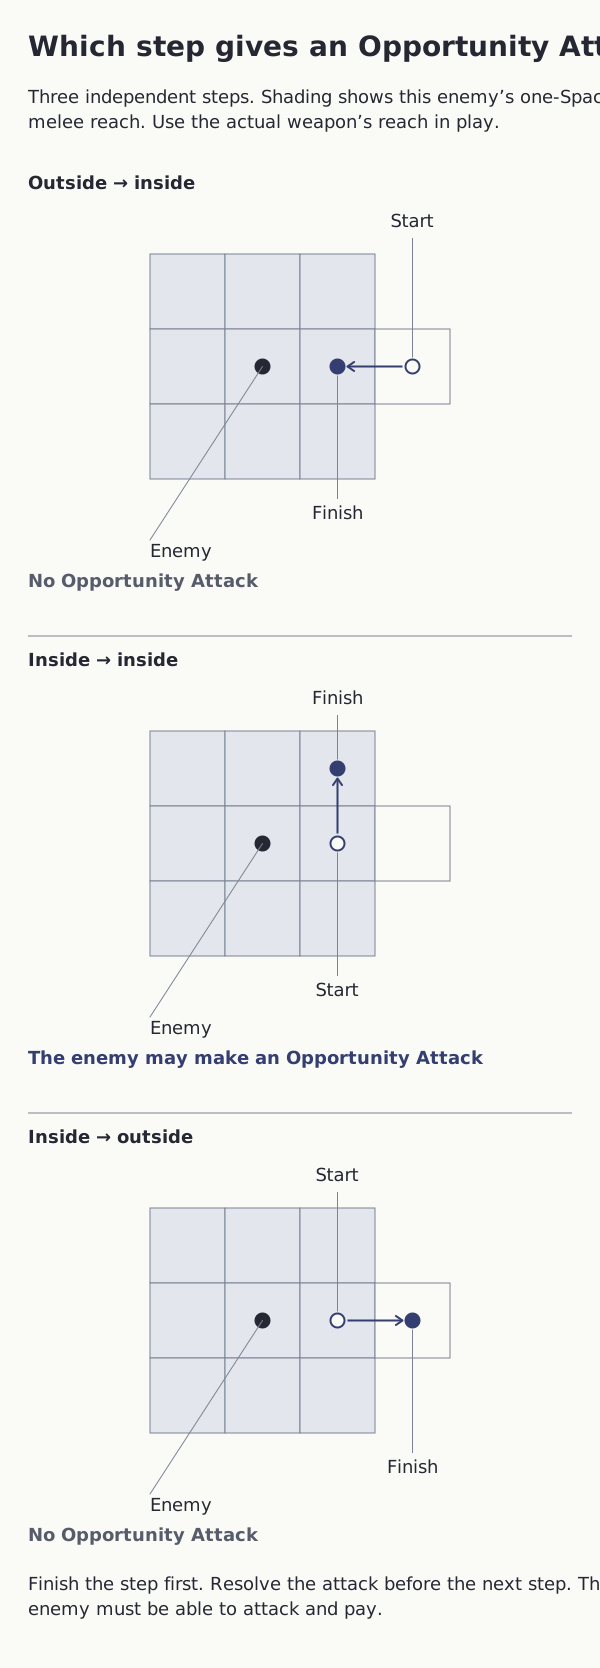


Read the diagram as text
Three independent examples with one-Space melee reach. The shaded Spaces are within this enemy’s reach; use the actual weapon’s reach and obstructions in play.
- Entering reach goes from an outside Space to an inside Space. It does not trigger this Opportunity Attack.
- Moving between two different Spaces both within reach can trigger an Opportunity Attack. Complete and pay for the step first.
- At the new position, the enemy must perceive the mover, have a legal Melee attack and pay its cost. Resolve that Exchange before the next movement step.
- Leaving reach goes from inside to outside. It does not trigger this Opportunity Attack.
Result: Only the middle, inside-to-inside step can trigger the attack. Entering or leaving reach cannot.
- The mover may choose a legal Exchange Response. The Reaction grants no Activation, uses no proactive Melee use and does not automatically stop remaining movement.
- Use actual reach and barriers. Forced movement follows the same trigger unless a specific rule prevents Reactions. Multiple opponents recheck legality before each attack.
- In Story and Cinematic Modes, agree the same inside-to-inside positions. There is no fixed facing or rear blind spot here.
Combat Modifiers
| Situation | Effect |
|---|---|
| Attacker blinded / in darkness | Attacks have Disadvantage |
| Attacker invisible | Their first attack while unseen by its target gains Advantage, then reveals their position |
| Attacker is prone | Their Melee attacks have Disadvantage. Prone alone adds no penalty to their Ranged attacks. |
| Ranged attack while engaged in melee | Your ranged attack has Disadvantage |
| Ranged target beyond Effective Range but within Maximum Range | Attack has Disadvantage |
| Ranged target beyond Maximum Range | Cannot be targeted with that weapon |
| Target has full cover | Cannot be targeted unless the cover is bypassed |
| Target has partial cover | Attacks against the target have Disadvantage |
| Target invisible / unseen | Attacks against it have Disadvantage. If its location is unknown, it cannot be targeted. |
| Target is prone | Melee attacks gain Advantage; Ranged attacks suffer Disadvantage unless the target can neither move nor take physical actions |
| Target restrained / paralyzed / unconscious | Attacks gain Advantage |
| Target is much larger and easier to hit because of its size | Attacks gain Advantage; confirm the size difference before commitment. |
| Target is much smaller and harder to hit because of its size | Attacks suffer Disadvantage; confirm the size difference before commitment. |
| Target moving during a Sprint | Ranged attacks resolved during that movement have Disadvantage, except on a straight approach towards or retreat directly away from the attacker. |
| Target is unaware of this attack | The attack has Advantage and the target makes No Response. Recheck awareness for each later attack. |
| Using an improvised weapon | Attacks made with it have Disadvantage |
- Only one source of Advantage and one source of Disadvantage can apply per roll; they do not stack.
- If both apply, they cancel.
- The Guide may apply Advantage or Disadvantage for other circumstances, such as strong wind or slippery ground.
Compare the creatures' visible size. A person attacking a tiny bird or an enormous giant may qualify for the size modifier; two people of slightly different heights do not. The Guide decides before anyone commits dice.
The Sprint modifier applies only while the target is moving as part of its Sprint. It stops when that movement stops, even for another action, and applies again if the Sprint resumes. Check the target's direction when the shot happens. Moving across the attacker's view or along a curved route is not a straight approach or retreat. Choosing Sprint does not give protection for the whole Round.
Hidden and Unseen Creatures
Hide determines who you are hidden from, how you move while hidden and what reveals you. Being hidden does not make you physically invisible.
If a creature cannot see you but knows your position, its attacks against you have Disadvantage. If it cannot locate you, it cannot target you directly. It may still affect an area that includes you.
Your first attack while unseen by its target gains Advantage. After that Exchange, the target knows your position. This includes an attack made as a Clash or Opportunity Attack. If your approach exposes you earlier, it reveals you at that earlier point. An aware target may choose a legal Exchange Response normally; an unaware target follows No Response.
Learning your position does not end the effect making you Invisible. You remain unseen while that effect lasts, so attacks against your known position still have Disadvantage. Further attacks gain no Advantage just from being unseen while that creature can locate you. Conceal your position again through Hide or another effect before claiming a new unseen opening. Check each observer separately: one creature may know your position while another does not.
Conditions and Statuses
A Condition changes what a character can do or how they roll. Apply the effects below for as long as the Condition lasts.
| Condition | Effect |
|---|---|
| Blinded | You can’t see. Your attacks have Disadvantage. A task requiring sight alone is impossible. You need another sense or reliable information to locate a target. |
| Deafened | You can’t hear. A task requiring hearing alone is impossible. Effects that require you to hear them cannot affect you, including helpful effects. |
| Hindered | Disadvantage on physical Skill Checks. You can’t Sprint. |
| Inspired | Advantage on one chosen Skill Check between the starts of your turns, and on any Impaired Refresh rolls. |
| Invisible | Others can’t see you. Attacks against your known position have Disadvantage; a creature that cannot locate you cannot target you directly. Your first unseen attack reveals your position after its Exchange. See unseen attacks. |
| Lingering Harm | Unless its rule says otherwise, take 1 Wound from each source still affecting you at the end of each of your turns. |
| Panicked | Disadvantage on Skill Checks. On your turn, retreat from the fear source if able; you can’t voluntarily approach it. You can Boost only movement checks. |
| Paralyzed | You can’t move or take physical actions. You may take actions needing only thought or speech if their rules allow it. All attackers have Advantage. |
| Prone | Your Melee attacks have Disadvantage. Melee attacks against you have Advantage; Ranged attacks against you have Disadvantage, except while you are helpless. Standing has a base cost of 1 AD. See ground movement. |
| Reeling | Disadvantage on attacks and physical Skill Checks, including Full Guard and Clash. |
| Restrained | Base Movement 0; you can’t voluntarily leave your Space. Disadvantage on physical Skill Checks. All attackers have Advantage. Follow the restraint’s rule for escape, forced movement or transportation. |
| Slowed | Double your AD costs, including Boost and Exchange Responses. The extra payment adds no dice to your roll. Halve Base Movement. |
| Stunned | Disadvantage on Skill Checks and any Impaired Refresh rolls. You can’t take Reactions. You may still choose a legal Full Guard or Clash response and pay its cost. |
| Unconscious | You can’t act, move or notice what happens around you. You are Prone and automatically fail active Skill Checks. All attackers have Advantage. Follow Death & Recovery when Vitality causes collapse. |
| Unnerved | Disadvantage on Skill Checks, including attacks, casting and Exchange Responses. |
| Weakened | Your Refresh is Impaired. Roll Used AD: each Hit or Critical Hit returns that die to Ready; each Miss remains Used. |
Getting the same Condition again does not add its effects together. Keep each source and ending time. Apply the strongest effect still active; this does not give a stronger application the duration of a weaker one. Removing one source leaves the others. Lingering Harm is the exception to non-stacking: each separate source causes its own Wounds, following its source rules.
Physical checks include weapon attacks, Full Guard, physical Clash responses, escape attempts and other checks resolved through bodily effort or coordination. The actual method matters; a thought-only or speech-only check is not physical. A penalty to Skill Checks applies during Actions, Reactions and Exchange Responses. Full Guard and Clash are Exchange Responses, so Stunned does not prohibit them through its ban on Reactions. Its Disadvantage still applies to their checks.
If you can neither move nor take physical actions, you are helpless for Prone's ranged modifier: Prone does not give ranged attacks against you Disadvantage. This includes Unconscious and Paralyzed characters. Other sources of Edge still apply normally. You cannot choose a physical response you are unable to perform.
Recovery Rolls and Continuation Checks follow their own rules. A Skill Check penalty or automatic failure does not change those rolls or a fixed Readiness score. A particular effect may expressly change its resistance; follow that effect.
Reeling
You have been rocked by a jarring impact and are struggling to keep your coordination. Your attacks and physical Skill Checks have Disadvantage, including Full Guard and Clash. You can still Boost, move and take permitted Reactions.
Unless the effect says otherwise, Reeling ends at the end of your next turn. If you gain it during your own turn, this means the end of your following turn. When an Exchange causes Reeling, finish that Exchange before applying it. Taking an ordinary Wound does not automatically make you Reeling.
Full Guard's normal Advantage cancels Reeling's Disadvantage. You roll without Edge, unless another rule changes it. The attacker resolves their own Edge separately.
Example: Rook's blow leaves Mira Reeling. On the next attack, she chooses Full Guard and adds one Boost AD. Its Advantage and her Disadvantage cancel; she rolls her two dice normally. She can still try to fight back with Clash, but that attack has Disadvantage.
Inspired
Between the starts of your turns, choose one Skill Check to make with Advantage. Choose before rolling. It may be an attack, Full Guard, Clash, a Reaction or a casting check. Gaining Inspired makes this allowance available; it resets when your turn starts. Receiving Inspired again before then does not restore a spent allowance.
Inspired also grants Advantage on Impaired Refresh rolls. It does not make automatic Refresh return extra dice or require a roll. Advantage can cancel Disadvantage without removing a Condition's other restrictions.
Senses and Targets
You cannot succeed by using a sense you do not have. A Blinded character cannot read ordinary ink by looking, and a Deafened character cannot hear a whispered password. Describe another usable method if you have one. If that method only partly overcomes the obstacle, the Guide may apply Disadvantage before you commit dice.
Blinded does not automatically make you unaware of every attack. Sound, touch or another sense may let you notice an attack and make a legal response. You still need a current target location to attack, and a rule requiring you to see its target still requires sight. Follow targeting and the visibility rules above.
Deafened prevents effects that expressly require hearing, whether harmful or helpful. It does not by itself protect against a blast's physical force or an effect whose rule does not require hearing.
Panicked
Name the source of the fear. On your turn, use your available ordinary movement to retreat along a viable route away from it. You choose the route and movement mode. You need not buy Run or Sprint, and panic alone does not force you into a known hazard or an obviously fatal route. You cannot voluntarily approach the fear source; forced movement follows its own rule.
If no viable retreat is available, you may still act under Panicked's other restrictions. You have Disadvantage on Skill Checks and can Boost only checks made to move. Ordinary movement, including Sprint, has no roll to Boost.
Duration, Refresh and Removal
Follow the applying effect's duration and ending rule. For an unusual effect without a written ending, the Guide states when it ends and how it can be removed before applying it. Keep track of each cause so that ending one does not erase another.
An effect lasting until the start of your turn ends before Refresh. An effect lasting through your next Refresh stays active for that Refresh, then ends. For example, Weakened through your next Refresh makes you roll those Used AD; Weakened ending at the start of that turn has already ended when Refresh happens.
Only Weakened or another effect that impairs Refresh makes ordinary Refresh a roll. Stunned gives Disadvantage if Refresh is impaired; it does not impair Refresh by itself. Inspired gives Advantage on that roll. Apply Edge once: both cancel, so an impaired die returns on a Hit or Critical as usual. Cancellation does not restore automatic Refresh or remove other restrictions.
Paralyzed and Unconscious do not themselves remove Vitality, create Wounds or replace a source's ending rule. When injury causes collapse, use Death & Recovery. A restraint's rule explains how to escape and whether forced movement or transportation ends it. You may Boost a permitted escape check unless a rule prohibits it.
Unnerved represents fear or distress that seriously disrupts your checks, rather than every moment of mild unease. Follow its source for duration and recovery. Removing one fear effect leaves any other cause in place; suppressing a penalty does not remove its source.
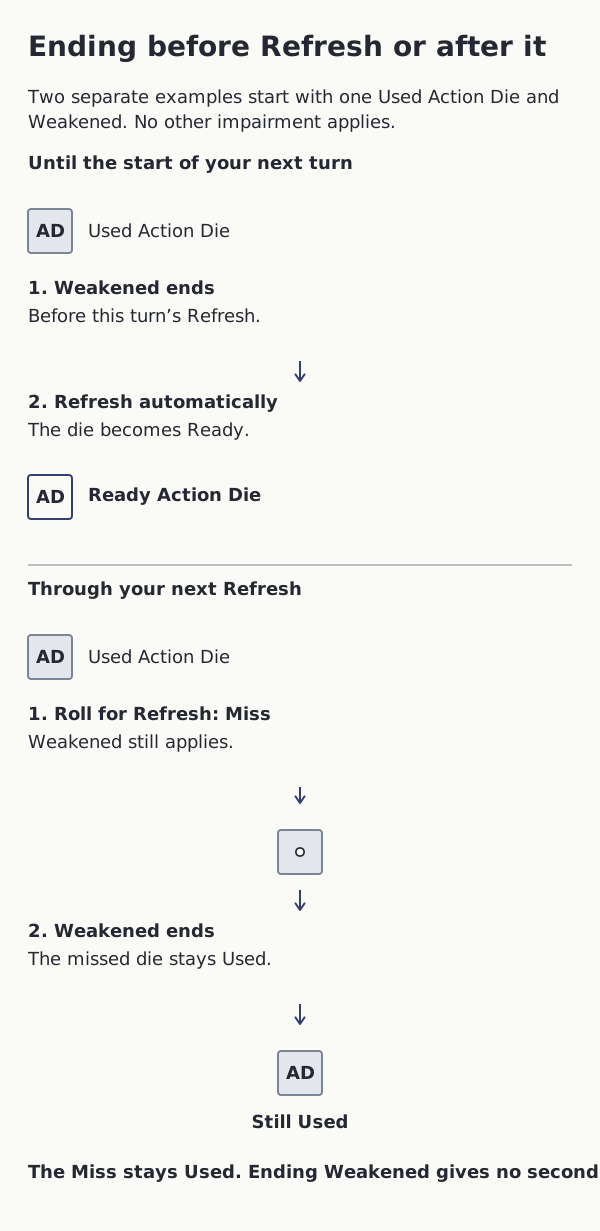
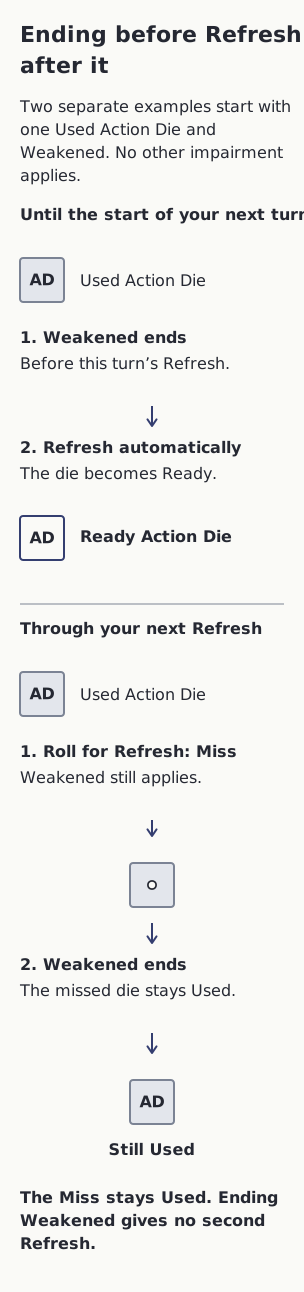

Read the diagram as text
Two independent examples each start with one Used AD and Weakened. There is no other impairment or modifier.
- First example: the source says “until the start of your next turn.” Weakened ends before Refresh, so the Used AD returns automatically to Ready.
- Second example: the source says “through your next Refresh.” Weakened remains active while the Used AD rolls for Impaired Refresh.
- The illustrated result is a Miss, so the die remains Used. Weakened then ends, but grants no second Refresh and does not return that die.
- A Hit or Critical Hit during Impaired Refresh would return its die to Ready. A Miss is only this example’s result.
Result: Ending after an Impaired Refresh Miss leaves the die Used. Exact effect-ending timing determines which procedure happens.
- Only Used AD roll for Impaired Refresh; Wounded dice and Magic Dice are excluded. See Narateer Dice: Impaired Refresh for the full procedure.
- Follow every source’s actual ending. Stunned alone does not impair ordinary Refresh. Cancelling Edge does not restore automatic Refresh while another impairment remains.
Slowed
While Slowed, double your AD costs after applying any discounts. This includes Actions, Reactions, Exchange Responses, AD spent on Boost, and additional AD costs from traits. Costs of 0 AD remain 0. Full Guard and Clash are both included; No Response stays free and has no roll.
The extra payment adds no dice to your roll and does not count as Boost. Pay the full cost, then roll the dice the attempt normally grants. MD costs and the number of trait uses you spend do not change. Follow Paying Costs and Rolling Dice for affordability, payment timing and spent dice.
Halve your Base Movement before calculating Walk, Run or Sprint. Keep Sprint's separate Skill bonus. See Movement.
Attack example: An attack normally costs 1 AD. Add 1 Boost AD, then double the cost for Slowed: pay 4 AD, but roll 2 dice. Without Boost, pay 2 AD and roll 1 die. The extra cost is not Boost and cannot activate a trait that requires it.
Guard example: Unboosted Full Guard pays 2 AD and rolls 1 die with Advantage. With Boost 2, it pays 6 AD and rolls 3 dice with Advantage. It still cannot deal damage.
Apply Slowed once to each payment. Repeated Slowed does not produce a fourfold cost.
Using Conditions
Look for cover, teamwork and Conditions that change your chances. State the Condition and what it changes, follow its ending rule, and treat Lingering Harm before it causes more Wounds.
Choosing a Condition
When an unusual effect has no named Condition, choose the closest match below and explain what it does.
- If out cold, use Unconscious. Being unaware of an attack does not make a character Unconscious; an unaware target follows No Response.
- If aware but can’t take physical actions, use Paralyzed.
- If a blow has rocked their physical coordination, use Reeling. If physical and mental checks are disrupted and Reactions are prevented, use Stunned.
- If held in place (net/grapple/roots), use Restrained; if only hampered, Hindered.
- If something keeps causing Wounds, use Lingering Harm. Name its Form and follow its rules for the harm's kind and how often it causes Wounds.
- If actions take more effort and movement slows, use Slowed.
- If it is harder to get Used AD ready again, use Weakened.
- If frightened but still able to act, use Unnerved; if fear forces retreat, use Panicked.
- If on the ground, Prone.
- If can’t see or hear, Blinded or Deafened.
- If unseen, use the visibility rules above. Use Hide for concealment and the Invisible condition when an effect grants it.
Unusual Combat Situations
Effects at the Same Time
Follow the time stated by each effect. If one Event triggers several traits, use Resolving Traits Together: the character who caused the Event first, then the direct targets, then anyone else with a valid Trigger. This order applies to those effects; it does not decide who takes the next turn.
When a rule calls for table order, start with the person playing the active character and go clockwise around the table. Online, agree on an order instead. Each person handles their characters when you reach them; the Guide handles the other NPCs. If one person has several characters, they choose the order of those characters before applying any of their effects.
At the end of a Round, apply effects in the order the creatures took their turns. Handle any creature that had no turn afterwards, following the agreed order of sides and characters. If several effects on one creature happen together, the person playing it chooses their order before applying any of them, unless a rule gives the order. Finish these effects before starting the next Round.
An effect that lasts until someone's turn still ends at that turn, even if the character goes earlier or later this Round. Changing order does not restart the effect's duration.
Companions and Servants
A creature such as an animal companion or a Bonebound Servant may have a rule that gives it a turn straight after its owner. It takes its own turn and uses its own dice. Finish that turn before passing to the other side. If several creatures follow one owner, agree on their order; keep it unless someone asks to change it.
The creature keeps its place in the order if its owner cannot act, leaves or dies. It still gets a turn. An absent or Deceased owner does not get a turn or Refresh.
If the creature starts the fight: that is its turn for the Round. It does not act again after its owner. From the next Round, it follows the owner normally. If it joined the fight before its owner arrived, it keeps its separate place when the owner joins.
Replacing a servant does not give another turn or Refresh if that owner's servant already had them this Round.
Example: Mira's hound attacks first while Mira is already in the fight. It finishes its turn. Later, Mira acts, but the hound does not act again. Next Round, it follows Mira.
Arrivals and Departures
Add a new character after the current turn finishes. They may be chosen at a later chance for their side this Round. Arrival itself grants no action, movement or Refresh. If attacked before then, they may still make a legal response.
- Joining an NPC group: add them to a group whose turns have not begun. If every suitable group has begun, they wait until next Round. Do not reopen a completed group.
- Following an owner: if the owner's place has passed, the creature waits until that place next Round.
- Returning to the fight: a character who already took a turn this Round does not get another. If their turn is still in progress, they may finish what remains.
- Joining as a new side: add the side to the end of the list. The side already due next stays next.
Removing a dead or departed creature does not give anyone else another turn. A creature that still needs recovery keeps its scheduled turn.
Three or More Sides
Use a repeating order: the side that started the fight, the side it attacked, then the other sides in an order the Guide states. If the opening equally affects several sides, put one containing a player character first among those tied sides. The Guide orders the rest.
Example: A hostile spirit attacks a bandit while the heroes try to seize a relic. The sides go spirit → bandits → heroes, repeated. Skip a side with no turns left. When the Round ends, continue with whichever side was due next.
To divide a crowd, count the characters with separate turns on each opposing side. Use the largest count to choose how many groups to make; do not add all sides together. Follow the same grouping guidance.
For a rescue or hazard without an enemy, use one side. Players choose their order normally. Apply the hazard when its rule says it happens; it does not need an enemy turn.
When Fights Meet or Loyalties Change
If two fights join, finish the current Activation, including responses from any new targets. Then combine the turn orders. Anyone who already took a turn in either fight's current Round has taken their turn. Keep dice, movement remaining and effects as they are; an effect's time limit does not restart.
If two Activations are already underway, finish the one you are resolving at the table first. Then finish what remains of the other character's Activation. Both count as their turns for this Round. If neither has a clear claim to go first, use Who Acts First?. Afterwards, continue with the side that would have followed the first of those turns. Skip sides with no turns left.
A character who changes sides keeps their place in this Round's order, but can help their new allies right away. Next Round, they go last on their new side unless that side changes its order. Keep their dice and effects as they are.
Summary
- Enter combat: Start a Combat Scene and apply a Scene Reset. The story decides who starts. The opening action belongs to that character's first Activation. Finish it without a second Refresh.
- Choose who goes next: Alternate sides. Choose a character or NPC group with turns left. Players may change their order with the next player's agreement.
- Start a turn: Your turn is your Activation: you hold Tempo and choose your actions. Resolve start-of-turn effects and recovery, Refresh Used AD, then act if you can.
- End a Round: Apply or end effects due at Round end, then start the next Round. The side due next stays next. Each character refreshes on their own turn.
- Choose a target: Check actual weapon reach or Range, the current target location and the attack path. Sharing a Zone does not grant melee reach or remove cover.
- Move in combat: Choose one normal movement mode and keep its remaining allowance around your actions. Cinematic crossings and local approaches both spend it; moving between Zones does not place you anywhere inside for free.
- Resolve an Exchange: Pay, choose a response, roll, resolve Edge and rerolls, then compare totals. Full Guard cannot harm; Clash can. A tie lands no clean hit.
- Calculate Wounds: Add Hit Margin and Strike Rating, then subtract Protection Rating. Look up the result in Wound Conversion. Apply the Wounds, then check for collapse or a Continuation Check.
- Find a modifier or Condition: Apply its stated effect. Advantage and Disadvantage cancel. Repeated Conditions do not add together, but separate sources of Lingering Harm each cause Wounds.
- End combat: Close the Combat Scene and apply a Scene Reset. Begin the next Scene if play continues. Follow any recovery or dangers that still need attention.